
Overview
CrowdChange Tap is a free mobile app for iPhone and Android that brings your fundraiser to your in-person event. It has two features, and you turn each one on separately for each fundraiser:
|
Feature |
What it does |
What you need |
|---|---|---|
|
Ticket scanner |
Check guests in by scanning the QR codes on their tickets and registrations |
Any payment processor |
|
Tap to Pay |
Take contactless card payments on a phone, with no extra hardware |
A fundraiser that accepts payments with Stripe, and a supported phone |
Check-ins and payments go straight to your fundraiser and show up in your reports right away.
Download the app: https://apps.apple.com/ca/app/crowdchange-tap/id6745146811 · https://play.google.com/store/apps/details?id=com.crowdchange.tap
Moving from the web ticket scanner? CrowdChange Tap replaces it. From November 1, 2026, new fundraisers must use CrowdChange Tap to scan tickets. See Moving from the web ticket scanner.
Before you start
-
The feature is available on your account. If you don't see CrowdChange Tap under Purchase options, or one of its features is missing, contact your Partner Success Manager or support@crowdchange.co.
-
Stripe, for Tap to Pay. If your fundraiser uses PayPal, Billhighway, Paysafe or Braintree, you can still use the app to scan tickets, but not to take payments.
-
A supported phone, for Tap to Pay. The phone needs NFC and the latest version of iOS or Android. Check Stripe's lists: Tap to Pay on iPhone · Tap to Pay on Android.
-
App permissions. Allow Camera (for scanning), Location (required for Tap to Pay) and Notifications when the app asks.
-
QR codes, for ticket scanning. Guests need tickets or registrations that include a QR code. See Step 2.
-
A backup payment method. Some cards can't be tapped (see Card limits). Keep another way to take payment on hand, such as card entry or a laptop.
Tip: Test every phone that will be used, and sign each person in, before event day. Phones vary a lot, especially on volunteer teams.
Step 1: Turn on CrowdChange Tap for your fundraiser
-
Go to your fundraiser and click Manage my fundraiser.
-
In the left menu, click Purchase options, then CrowdChange Tap.
-
Under Features, turn on Ticket scanner, Tap to Pay, or both.
-
Click Save.
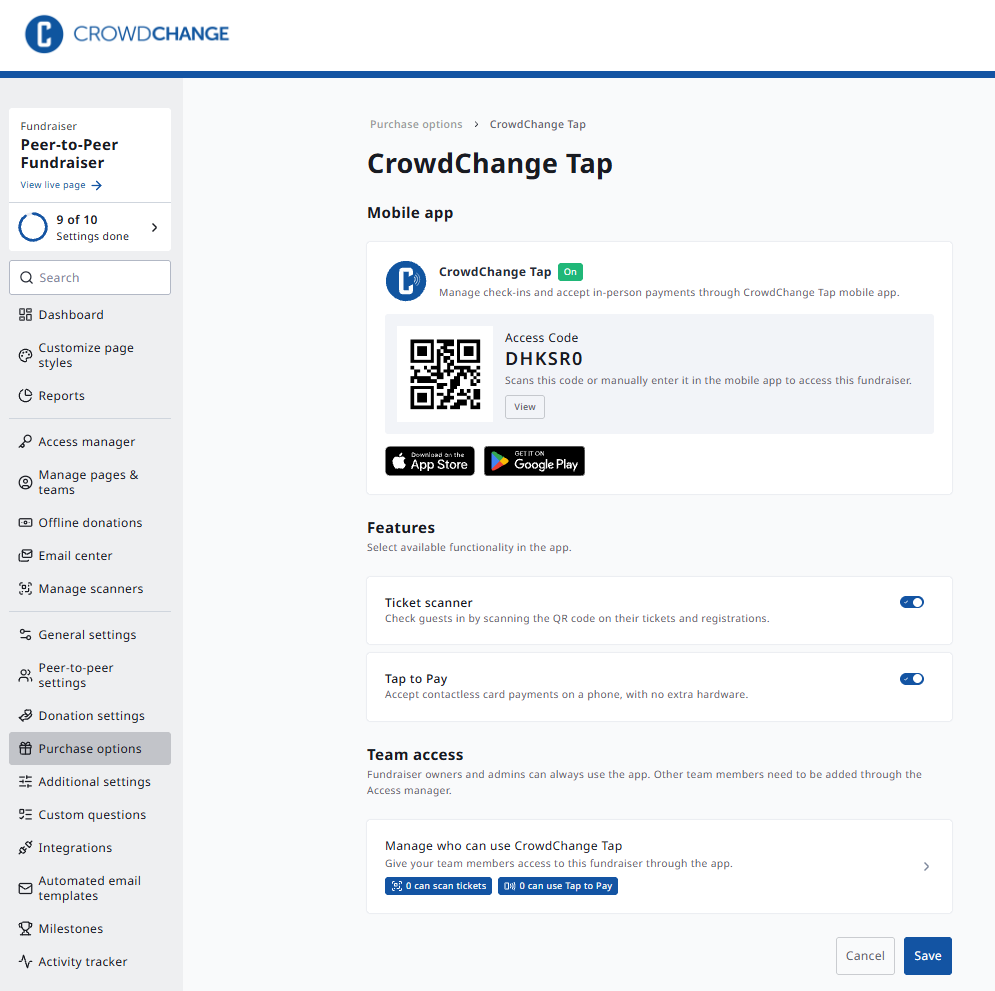
Once a feature is on, CrowdChange Tap shows as On at the top of the page. The page is in three sections:
-
Mobile app: your fundraiser's access code and QR code, with the App Store and Google Play links.
-
Features: the Ticket scanner and Tap to Pay switches.
-
Team access: how many team members can scan tickets and use Tap to Pay, with a shortcut to the Access manager (Step 3).
There's no separate on/off switch for the app. CrowdChange Tap turns on as soon as one of its features is on, and turns off when both are off. Tap settings are no longer under Additional settings.
Turn on CrowdChange Tap for many fundraisers (Blueprints)
If you run a peer-to-peer or DIY program, you can set up Tap once on the Blueprint:
-
Go to your Blueprint, then Purchase options › CrowdChange Tap.
-
Turn on Ticket scanner and/or Tap to Pay.
-
Choose whether to push the setting to existing fundraisers, and whether to lock it so fundraisers can't turn it off.
-
Click Save.
Each fundraiser gets its own access code automatically. Event staff are still added on each fundraiser (Step 3).
Step 2: Make sure guests get QR codes (ticket scanning only)
Tickets and registrations each have their own setting.
Tickets: go to Purchase options › Tickets and turn on Generate downloadable tickets.
Registrations:
-
Go to Purchase options › Registration and turn on Generate downloadable registration tickets.
-
Edit each registration tier that needs a ticket. Under Details, turn on Include ticket with QR code.
-
Click Save.
QR codes go in the normal purchase receipt, sent to the purchaser, with a PDF ticket and Apple Wallet or Google Wallet passes. Wallet buttons appear for 1 to 19 tickets per transaction. For 20 or more, the receipt still includes the QR codes and the PDF. Registrants don't get a separate email each.
If neither tickets nor registrations get QR codes, the CrowdChange Tap page shows a warning.
Note: Changing these settings doesn't resend receipts that were already sent. To send updated tickets to a guest, resend their receipt.
Step 3: Add your event staff
Fundraiser owners and admins can always use the app, with full access. Other team members need to be added through the Access manager.
To give volunteers or staff access to the app:
-
In your fundraiser's left menu, click Access manager. You can also get there from Purchase options › CrowdChange Tap: under Team access, click Manage who can use CrowdChange Tap.
-
Click + Add account and enter the person's details. They don't need a CrowdChange account yet. If they don't have one, they'll be asked to create one during setup.
-
In Set permissions, choose the level of access the person needs:
-
Tap to Pay and ticket scanning: check CrowdChange Tap.
-
Ticket scanning only: expand CrowdChange Tap and check only Scan tickets.
-
-
Click Save.
-
Share your fundraiser's access code with them so they can connect the app (Step 4).
There's no Tap to Pay-only option. Anyone you allow to take payments can also scan tickets.
Scan tickets only appears when the ticket scanner is on and the fundraiser has tickets or registrations. If you don't see CrowdChange Tap in Set permissions, turn on a Tap feature first (Step 1).
Several people can use the app at the same event at the same time. Each person signs in with their own login. To check who has access, look at the counts under Team access on the CrowdChange Tap page.
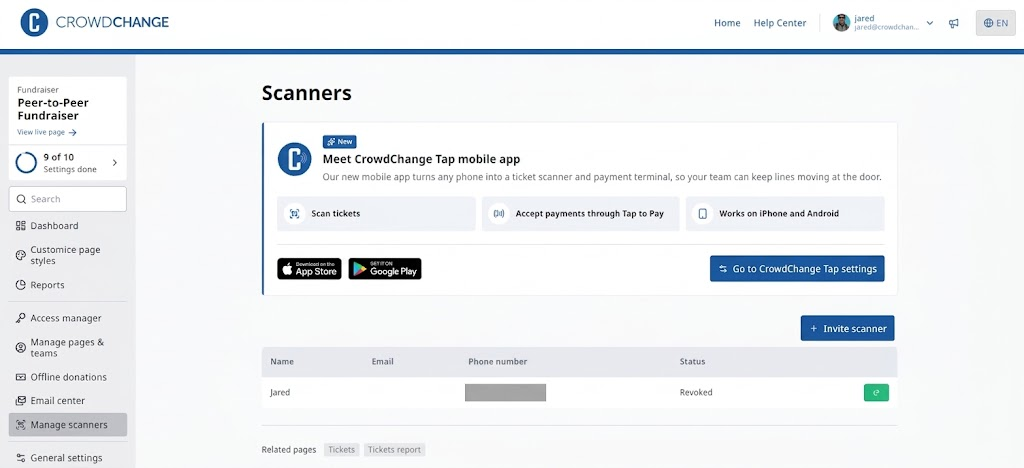
Tip: Manage scanners in the left menu belongs to the old web ticket scanner. You don't need it for CrowdChange Tap.
Step 4: Connect the app to your fundraiser
-
Download CrowdChange Tap from the App Store or Google Play.
-
Open the app. On the Access Code screen, tap Scan QR Code and scan your fundraiser's QR code. Or type the 6-character access code into the boxes and tap Continue.
-
On the Sign In screen, sign in the same way you sign in to CrowdChange: Continue with Google, Continue with Apple, or your email and password. If your account uses two-factor authentication, you'll also be asked for your code.
-
Optional: to sign in faster next time, turn on biometric sign-in under Account in the app's side menu. After that, tap Sign in with Touch ID (or Face ID, depending on your phone) on the Sign In screen.
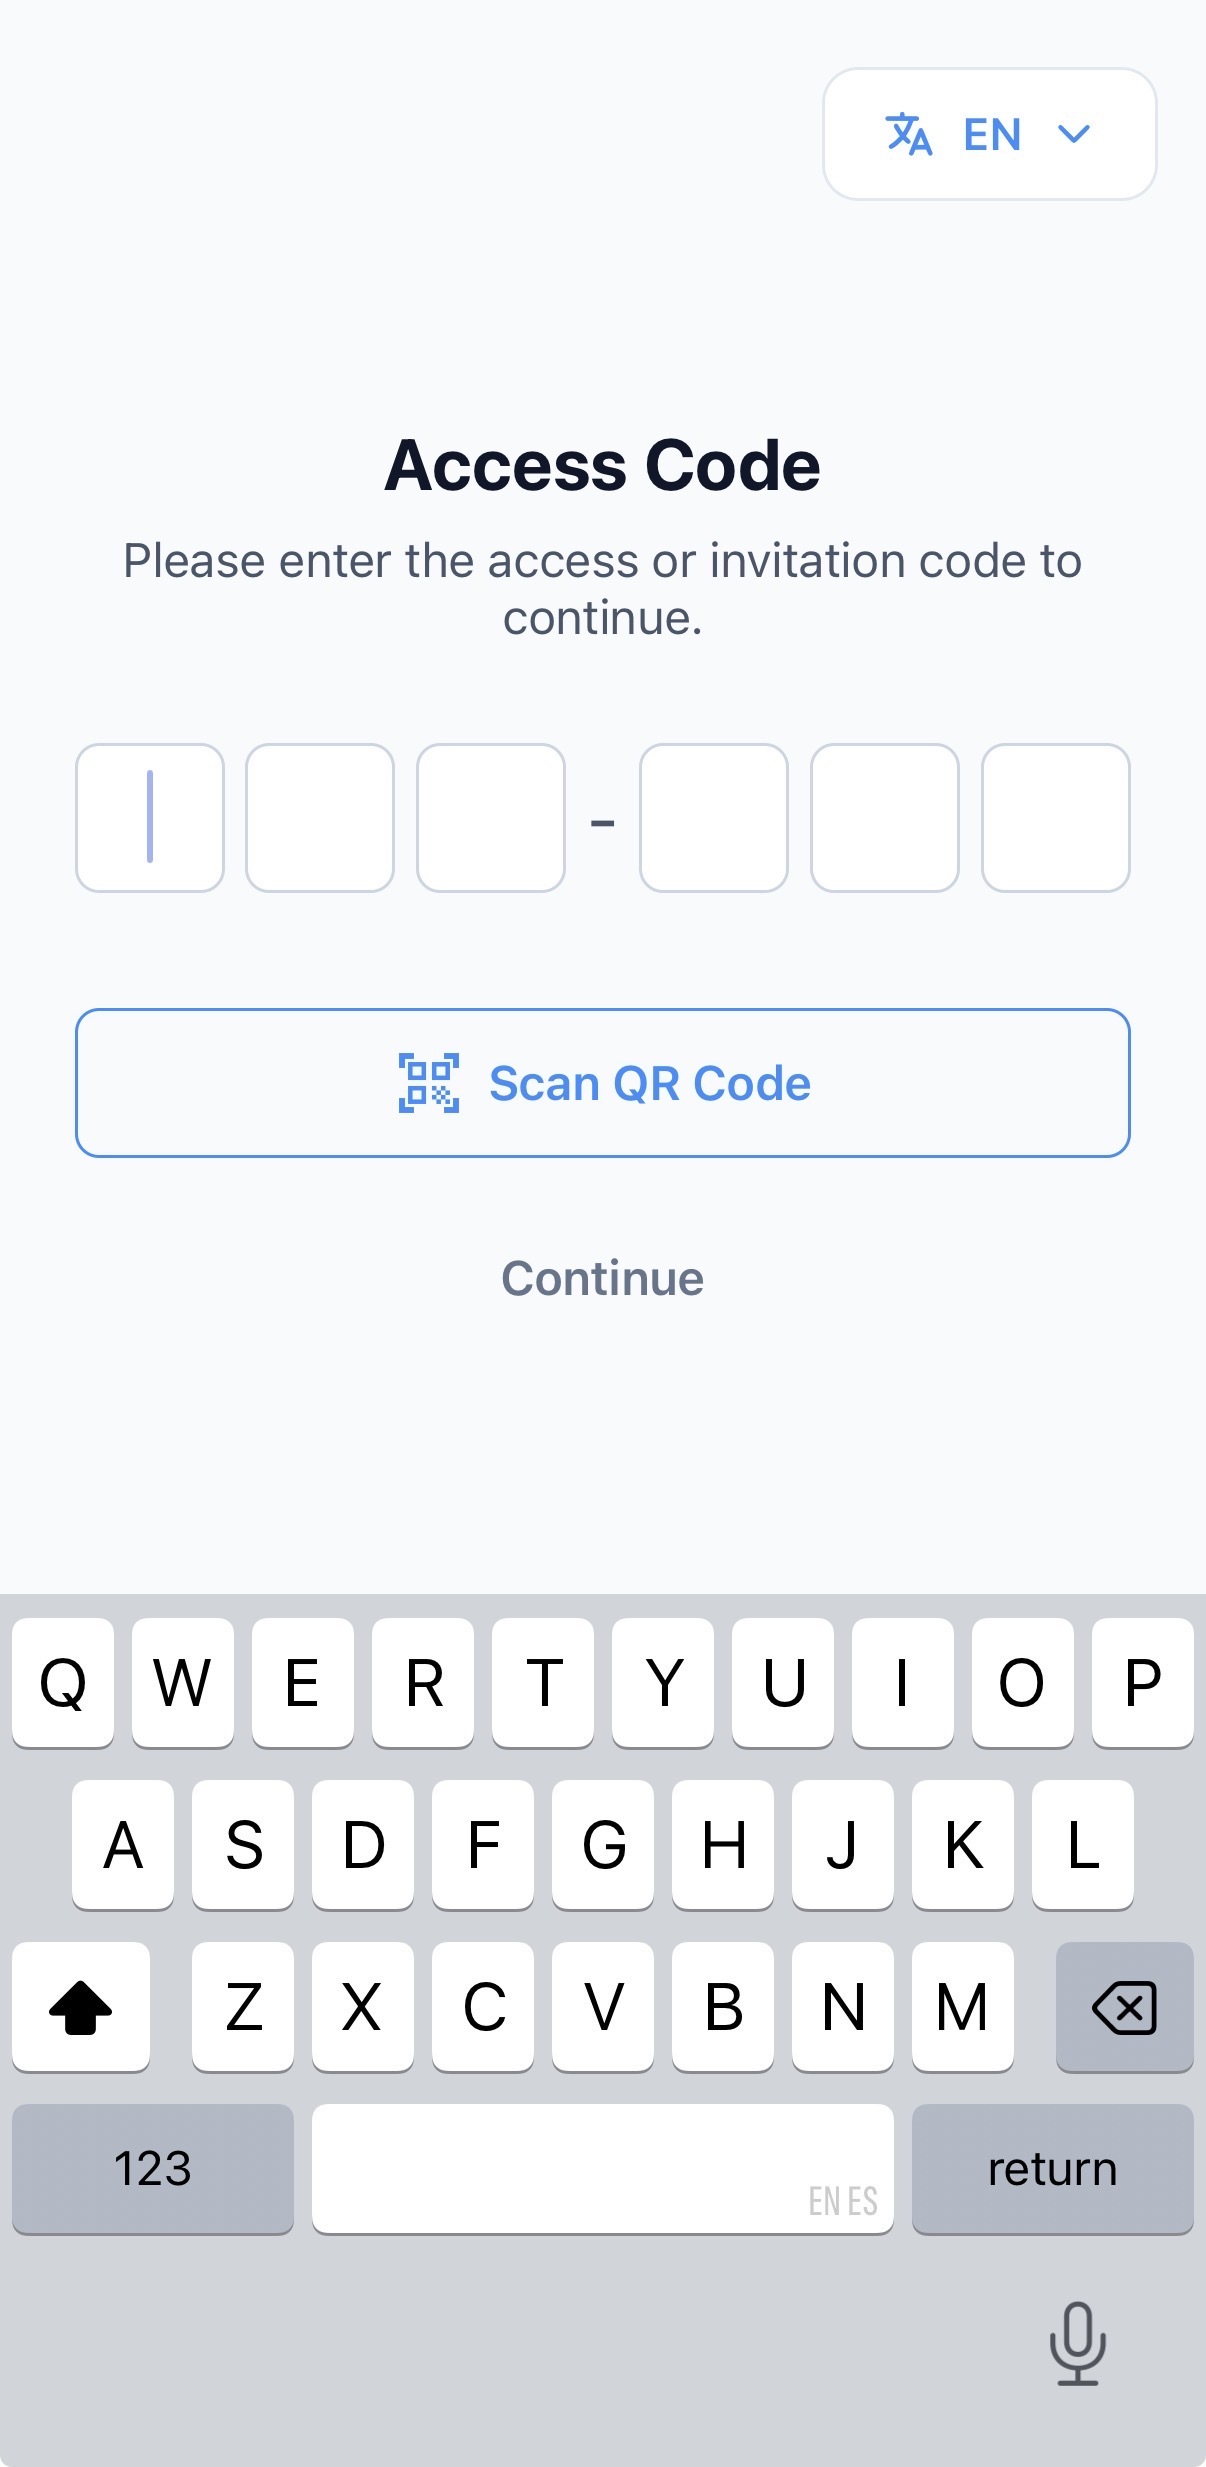
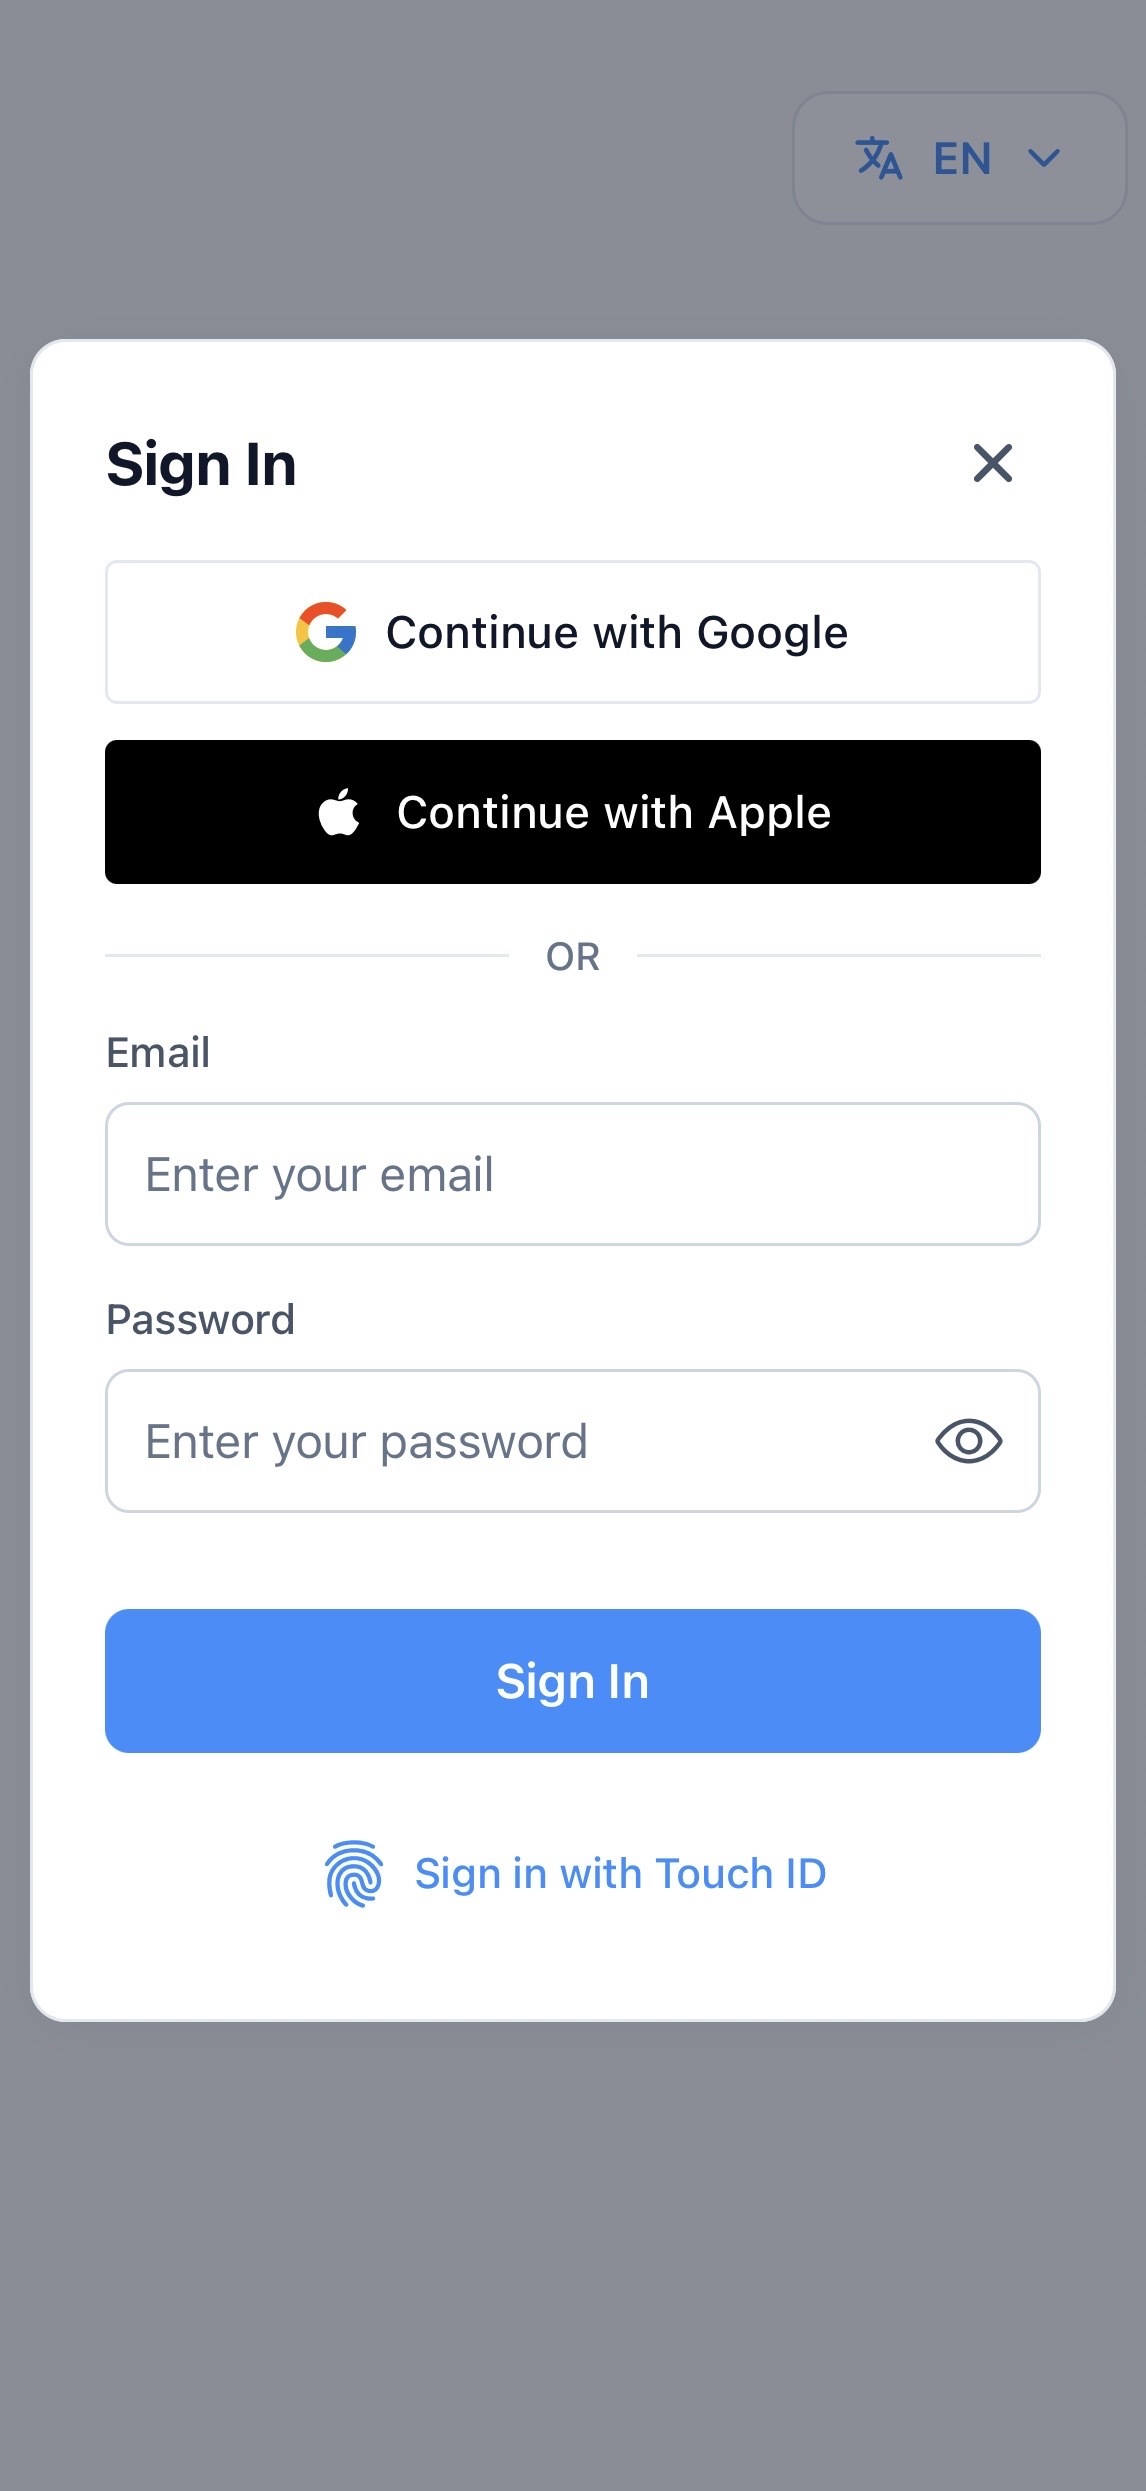
Tip: to use the app in French, open the language menu (EN) at the top right of the Access Code or Sign In screen.
Where to find the access code:
Fundraiser owners and admins can open it in three places. Each one shows the same QR code and access code.
-
On your fundraiser page: while you're signed in, click the CrowdChange Tap icon at the top of the page, next to Design and Dashboard. The Scan QR Code window shows the QR code, the access code and the App Store and Google Play links.
-
Purchase options › CrowdChange Tap, under Mobile app. Click View to open the QR code full size.
-
The CrowdChange Tap icon at the top right of your fundraiser Dashboard.
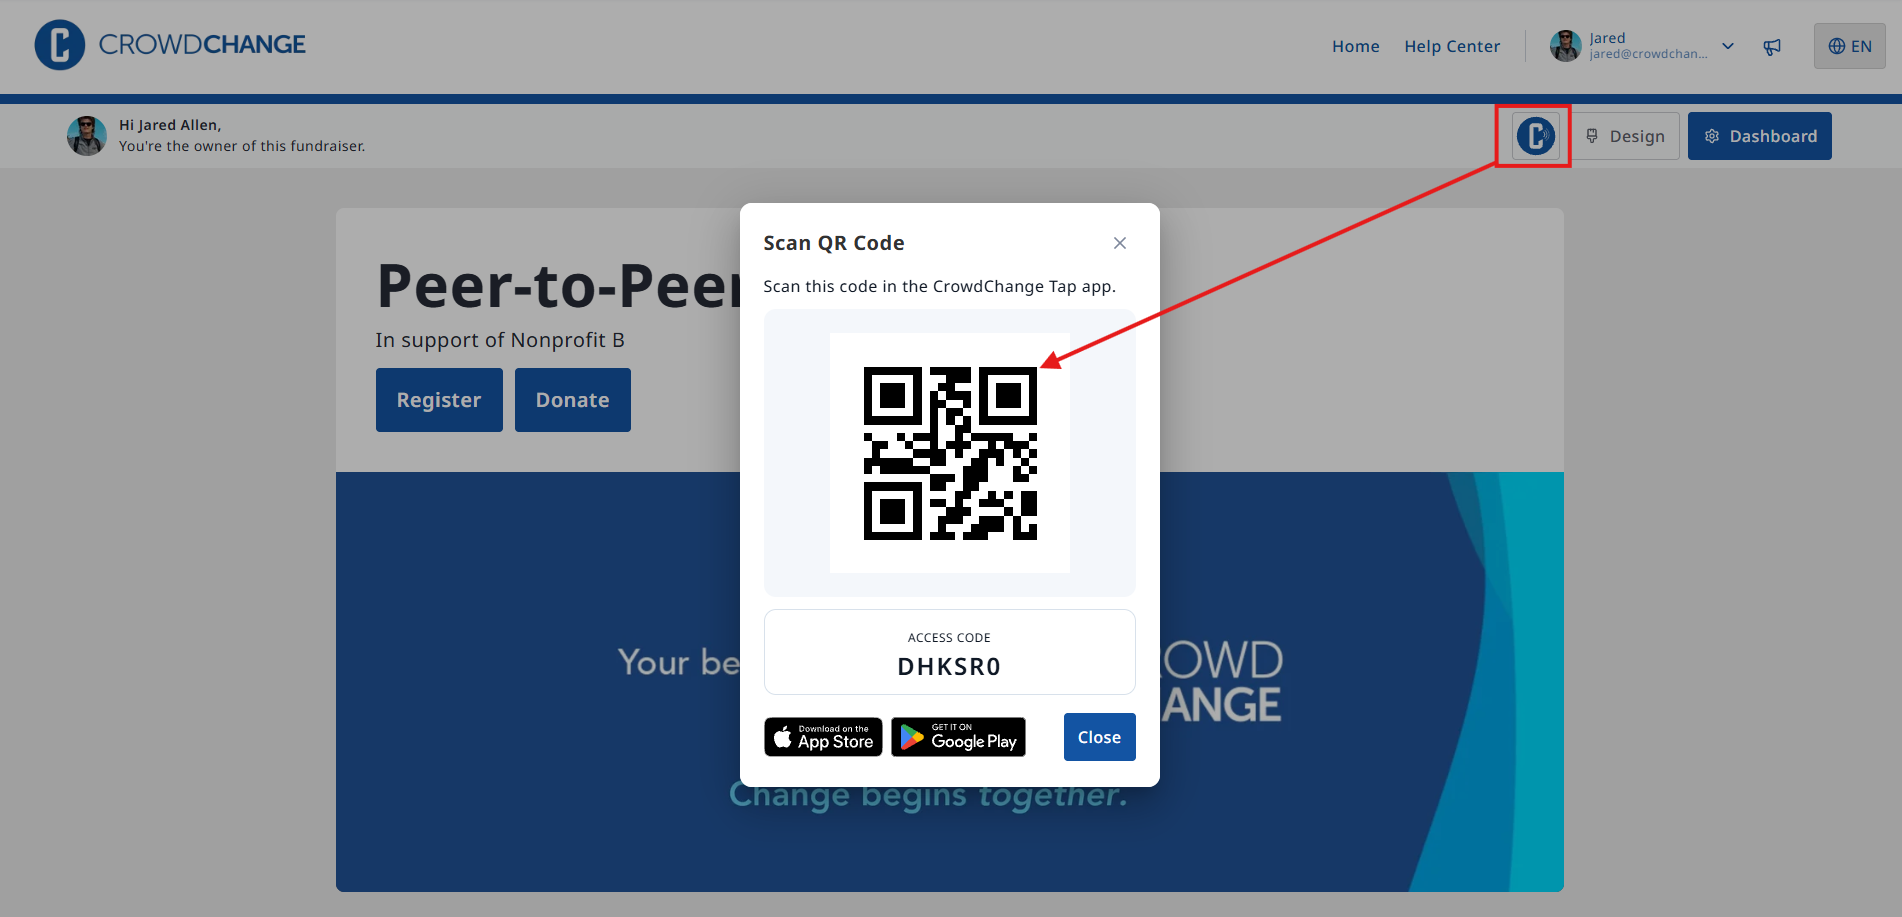
Event staff use the same access code. Share it with them before the event, or have them scan the QR code from your screen. If you type a code in, copy it exactly as shown: some letters and numbers look alike, such as the letter O and the number 0. Scanning the QR code avoids this.
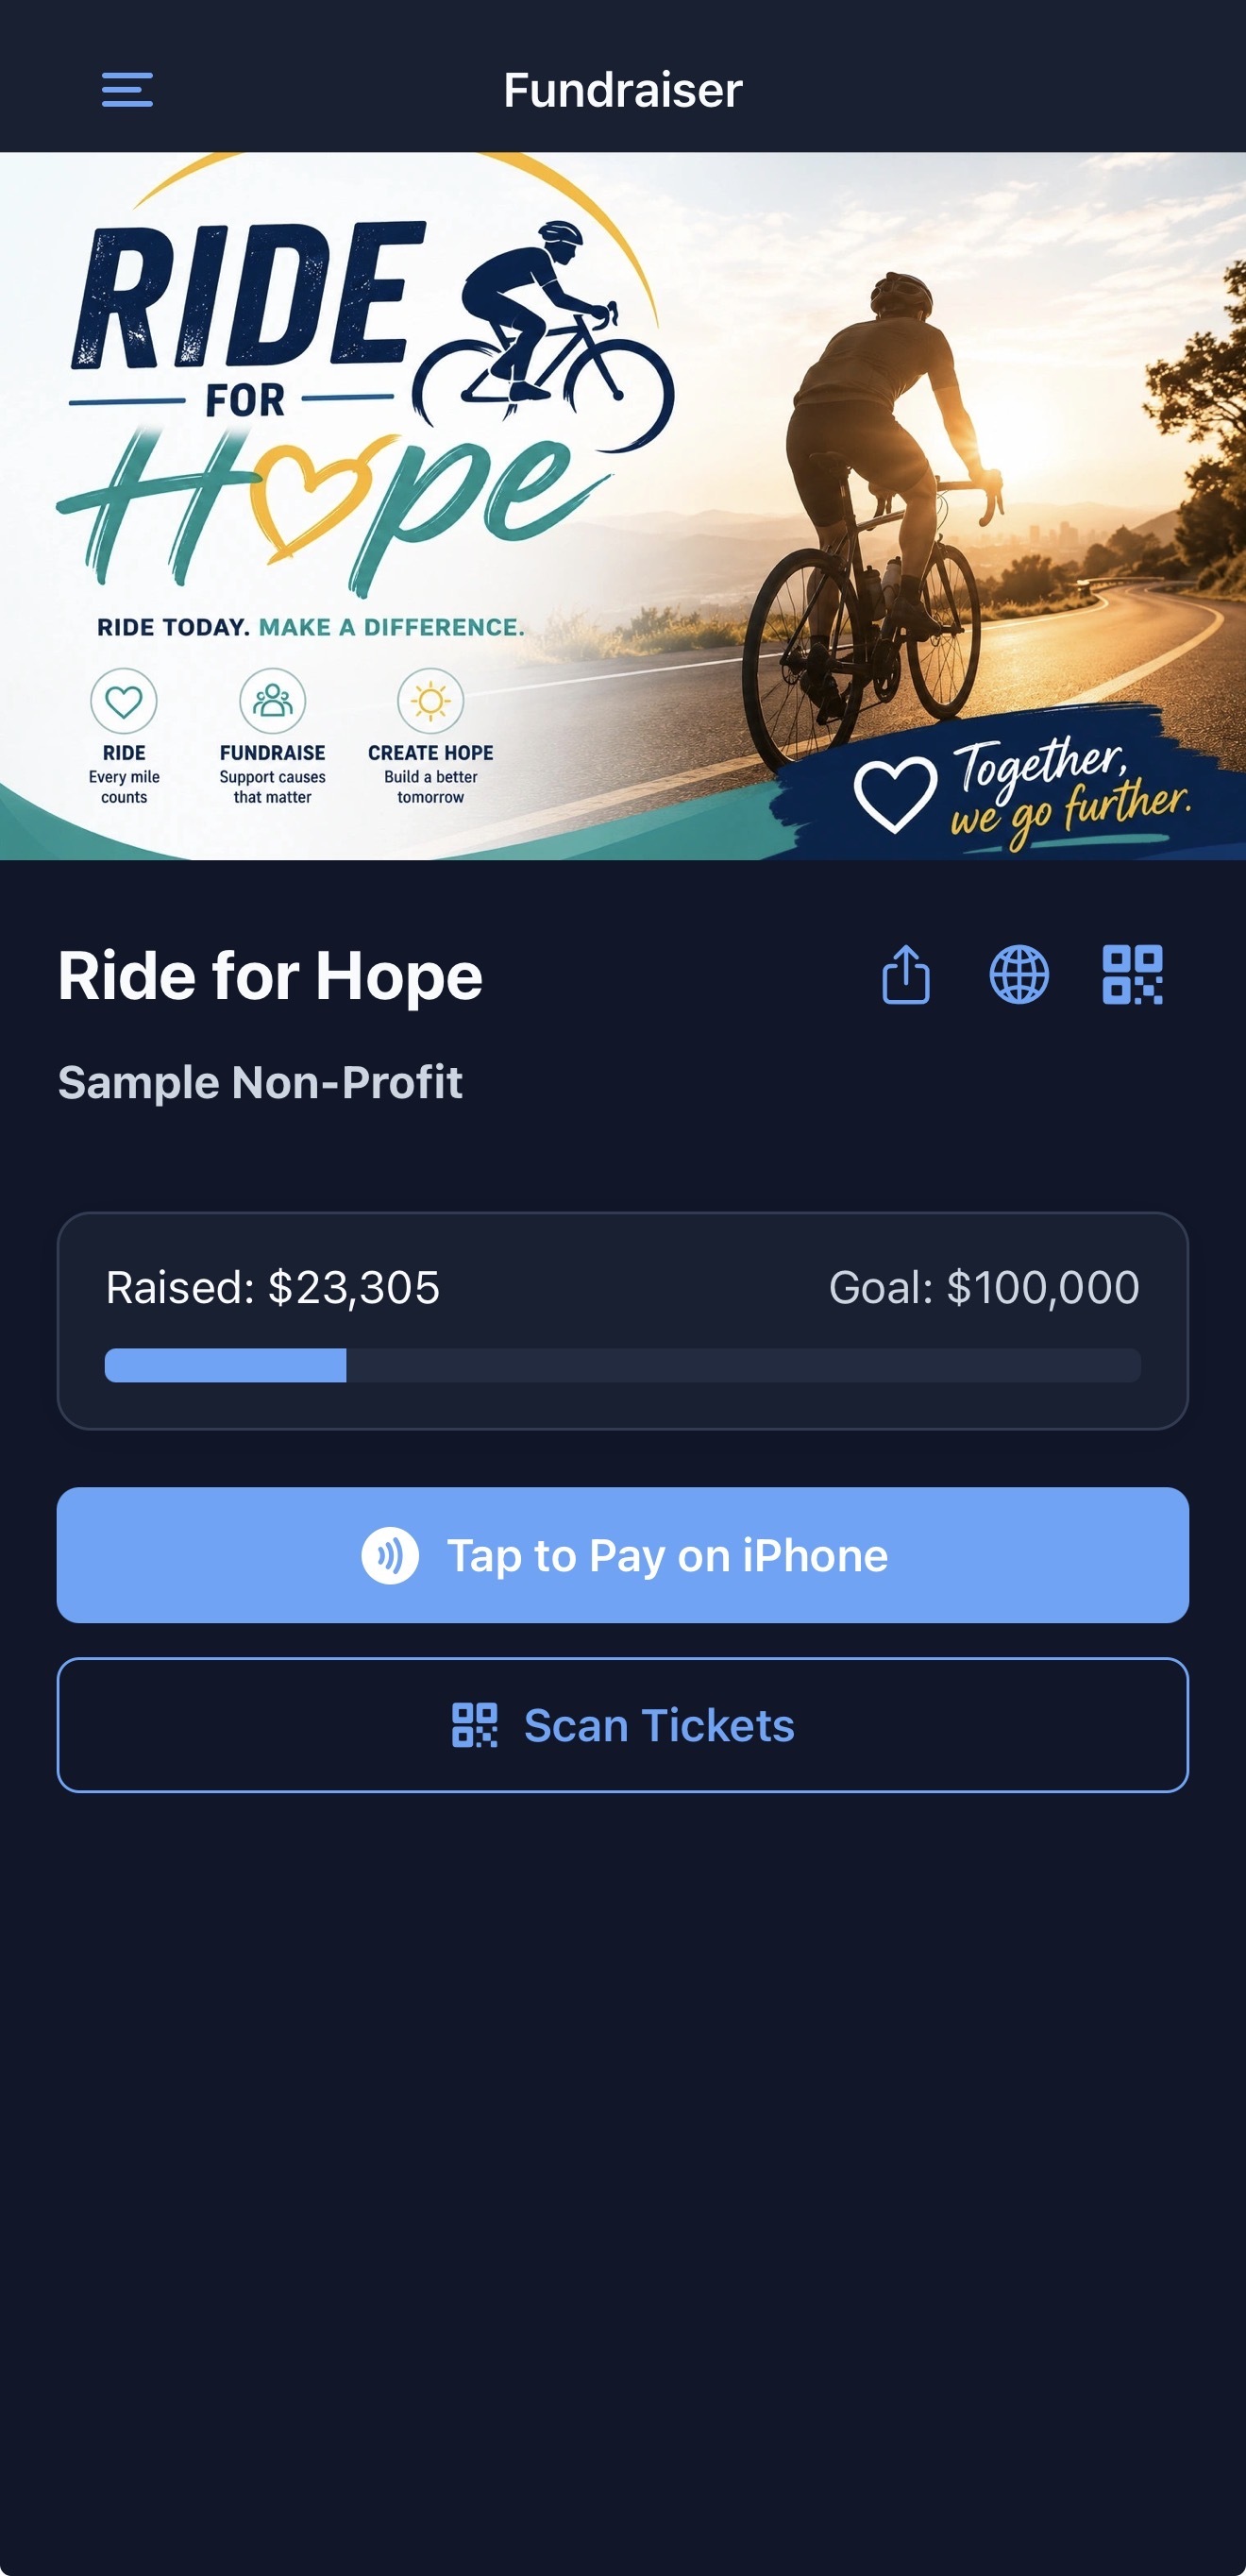
Once you're connected, the app opens on your fundraiser's page. It shows how much has been raised, with a button for each feature you have access to: Tap to Pay on iPhone and Scan Tickets.
Scan tickets at the door
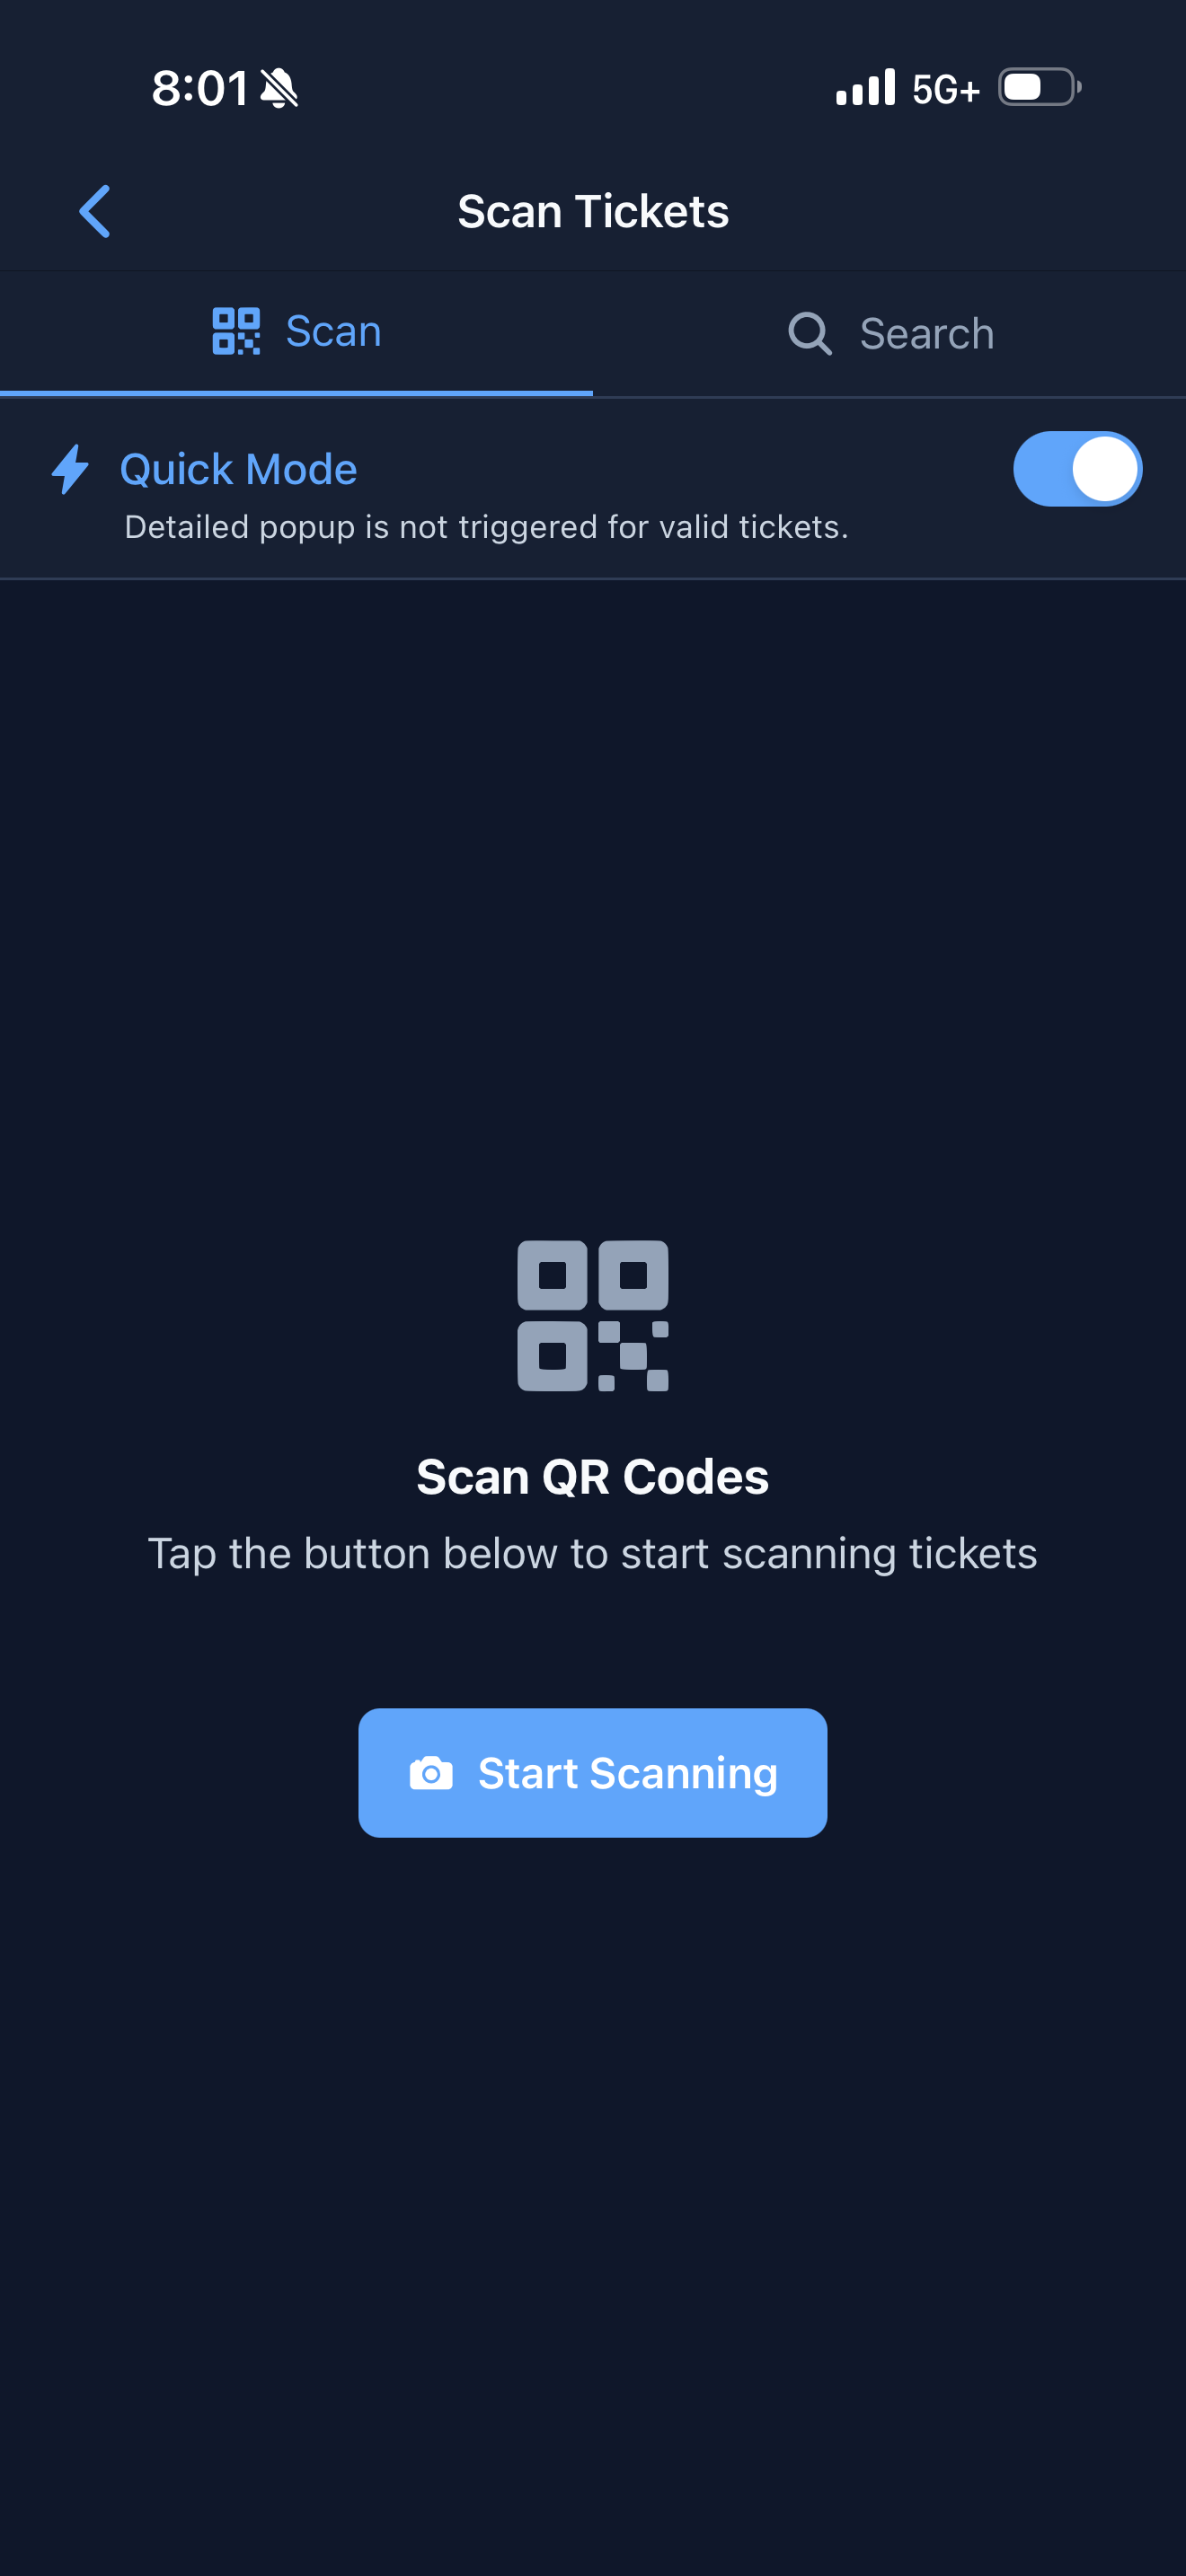
Tap Scan Tickets. The screen has two tabs.
Scan: tap Start Scanning and point the camera at the guest's QR code.
-
With Quick Mode off, every scan opens a popup with the ticket details. This suits smaller events, or doors where you want to see each guest's details.
-
With Quick Mode on, valid tickets show a short confirmation at the bottom of the screen, and you can scan the next guest straight away. Only invalid or already-used tickets open a popup. Turn it on for busy doors.
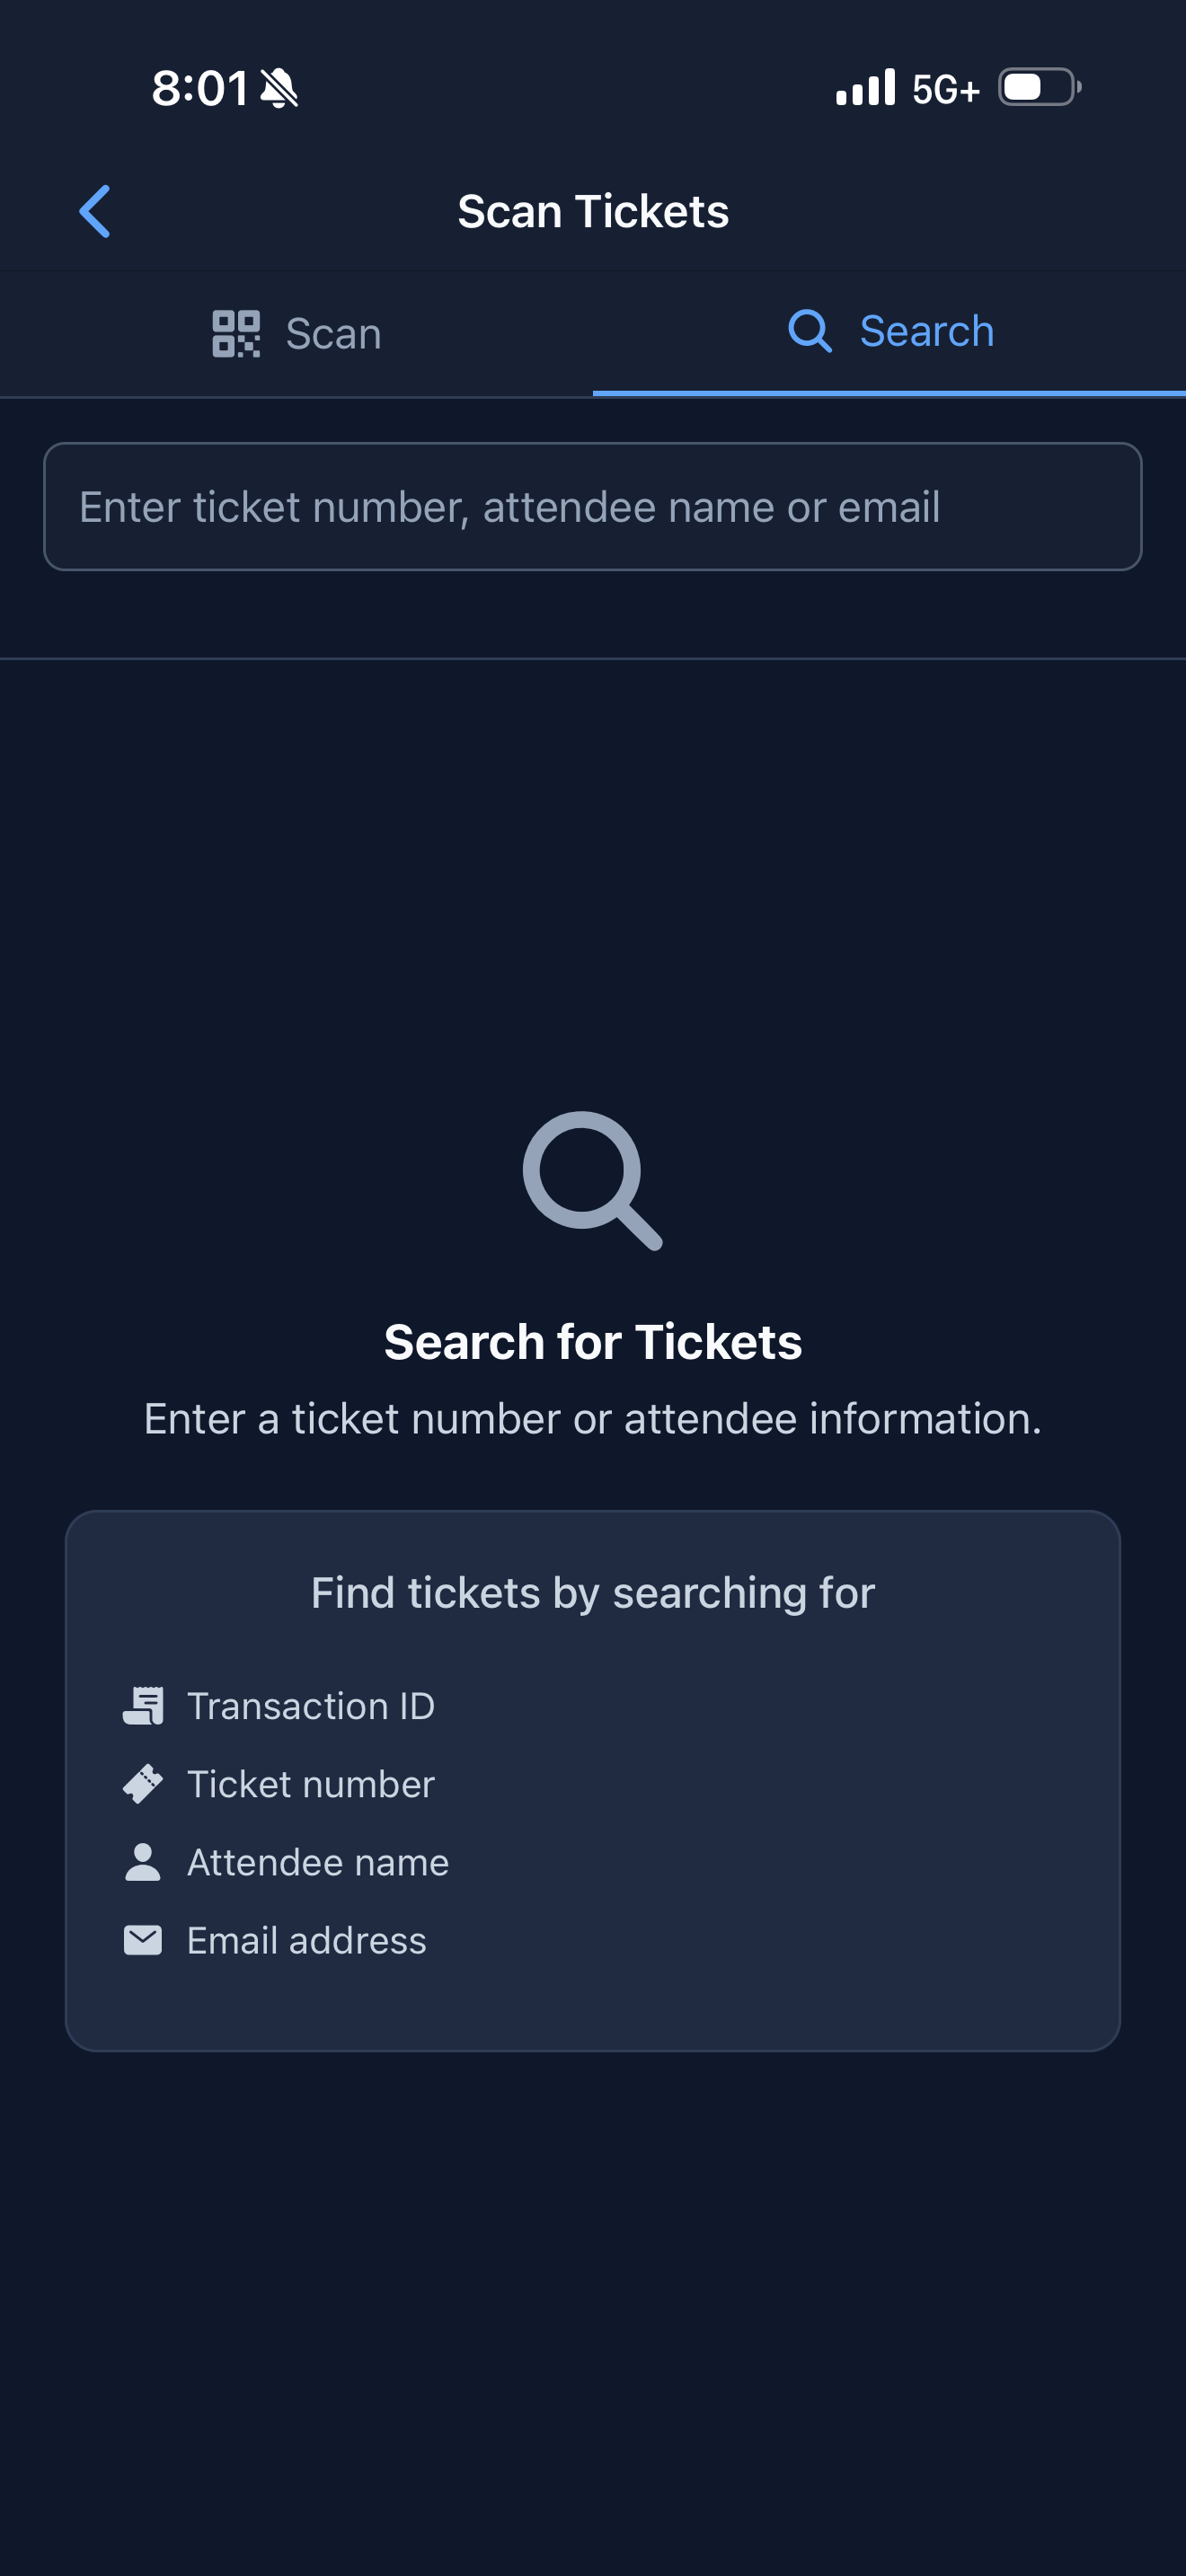
Search: use this when a guest has lost their ticket or the QR code won't scan. Search by transaction ID, ticket number, attendee name or email address. If a transaction has several tickets, each one is listed, and you check each one in by hand.
Once a ticket is checked in, it shows as used in Dashboard › Reports › Tickets Report. Cancelled or refunded tickets can't be checked in. Registrations with QR codes also appear in the Guests report, with their used/unused status.
Don't see Scan Tickets? All of these need to be true:
-
Ticket scanner is on under Purchase options › CrowdChange Tap.
-
The fundraiser has tickets or registrations.
-
Guests are getting QR codes (Step 2).
-
You have full CrowdChange Tap access, or Scan tickets (Step 3).
Take payments with Tap to Pay
-
On your fundraiser's page in the app, tap Tap to Pay on iPhone. [VERIFY] the Android label. If it's just Tap to Pay, name both.
-
Stay on the Enter amount tab. Under Payment Method, check that Tap to Pay on iPhone is selected.
-
Enter the amount.
-
Optional: under Customer information, enter the donor's first name, last name, email, phone number and any notes.
-
Tap Continue.
-
Ask the donor to tap their card or phone on your phone.
-
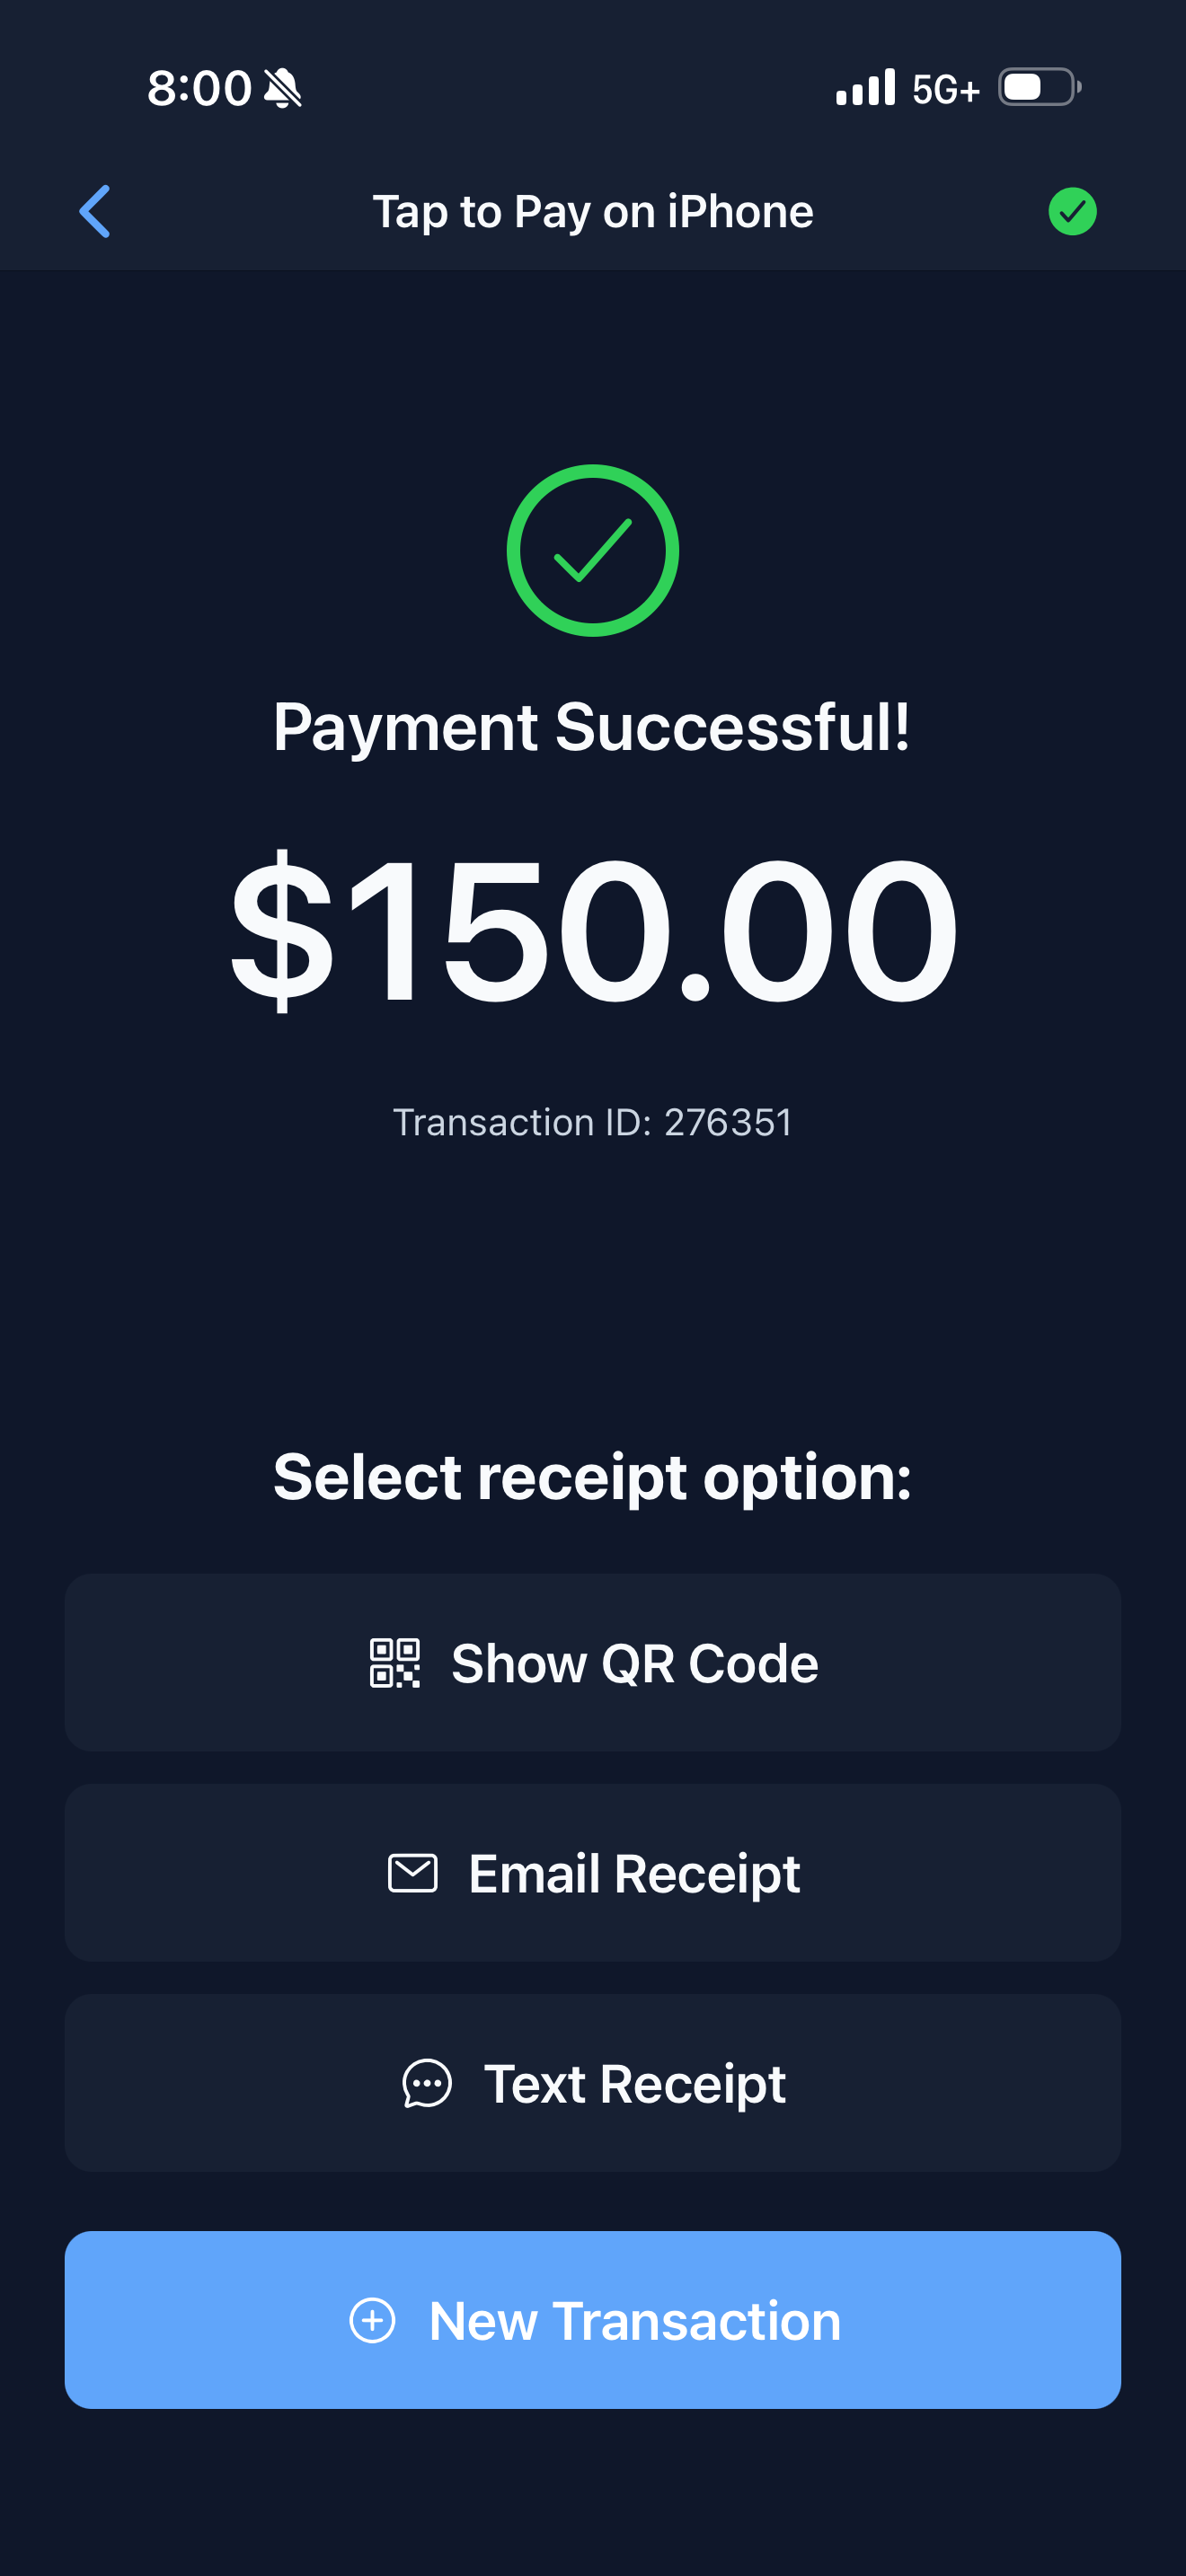
When you see Payment Successful!, choose how the donor gets their receipt:
-
Show QR Code: the donor scans it with their own phone to open their receipt and, if they want one, request a tax receipt.
-
Email Receipt: the donor gets the standard receipt email. It doesn't include the tax receipt page. See Issue a tax receipt for a Tap to Pay gift.
-
Text Receipt: the donor gets a link by text to open their receipt and, if they want one, request a tax receipt.
-
-
Tap New Transaction to take the next payment.
Notes you add are saved to the transaction and show in your reports and in the transaction details.
Is the phone ready? A green check at the top right of the payment screen means the phone is ready to take payments. A red warning triangle means Tap to Pay hasn't finished setting up on this phone. See Tips and troubleshooting.
New to Tap to Pay? Tap the Tap to Pay on iPhone Guide link on the payment screen for a walkthrough.
Card limits
-
About $250 per tap. Most cards only allow contactless payments up to about $250. Above that, the card usually asks for chip and PIN, which a phone can't accept. Use card entry instead. Plan for this if you're running a live auction or asking for larger gifts.
-
PIN prompts. Tap to Pay doesn't support PINs. Use card entry.
-
Interac debit (Canada). Interac-only debit cards are declined, because Interac payments can't be refunded online. Debit cards that also carry Visa or Mastercard (such as Visa Debit or Debit Mastercard) work. Ask the donor for another card, or take the gift another way.
Card entry
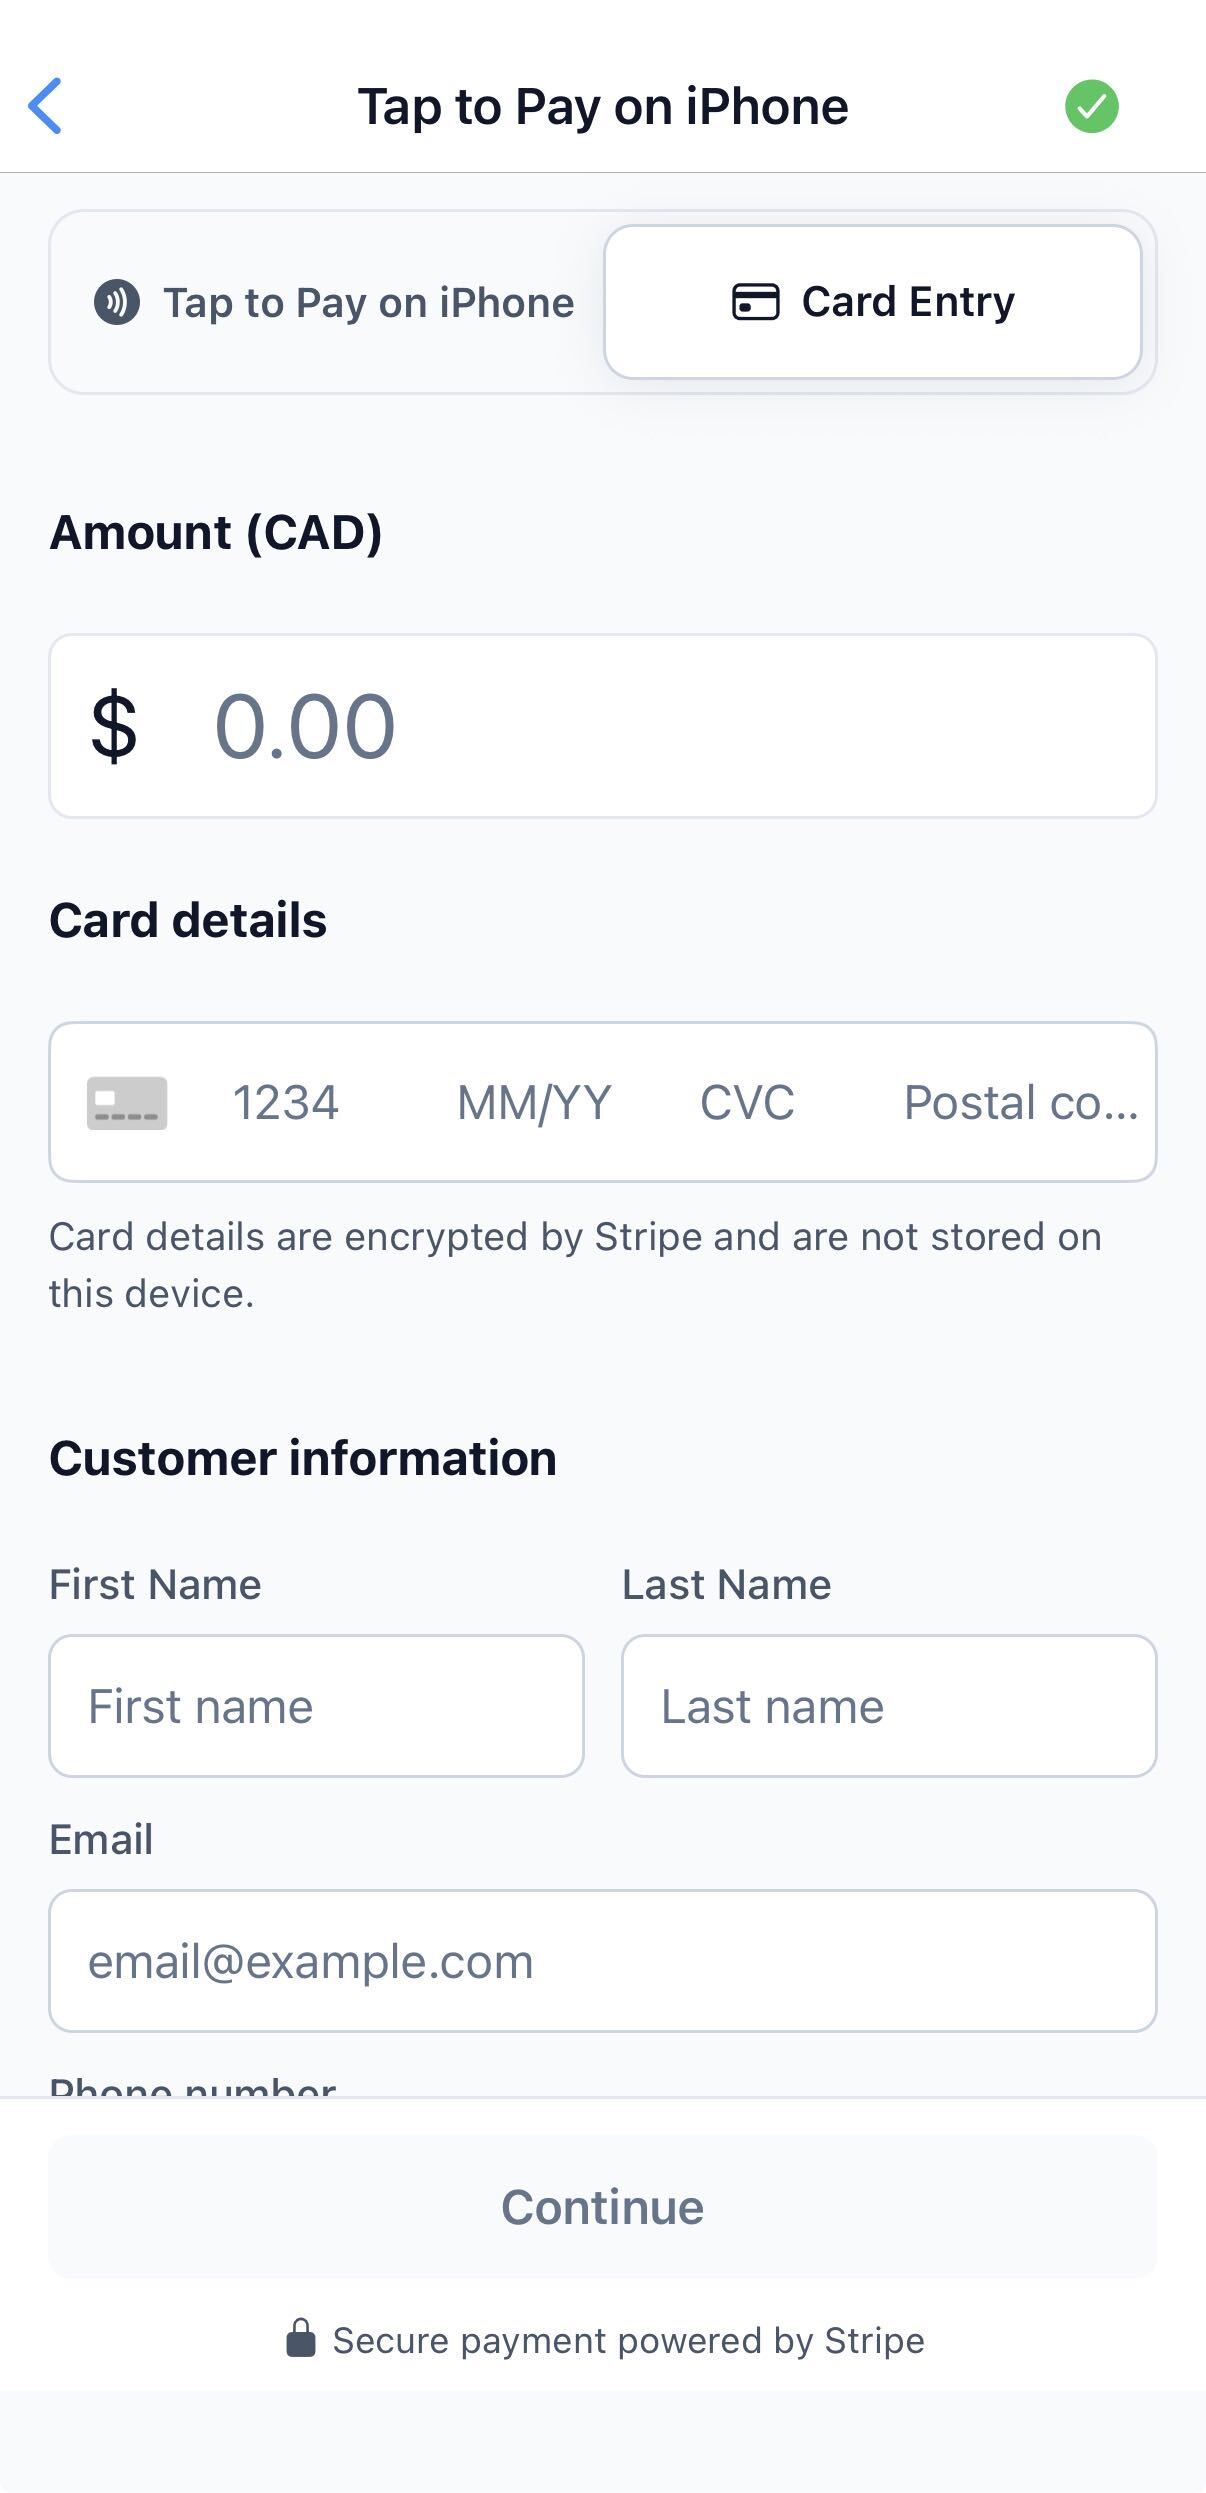
Use this when a tap fails, the card isn't supported, or the card asks for a PIN. On the payment screen, under Payment Method, switch to Card Entry. Under Card details, enter the card number, expiry date (MM/YY), CVC and postal code. Add the donor's details under Customer information if you have them, then tap Continue. Card details are encrypted by Stripe and aren't stored on the phone.
Donor details
The card doesn't share the donor's name or contact details with CrowdChange. If you don't enter them, the payment is recorded as anonymous.
After the event, donors can add their name and email through the link on their receipt. If their email already has a CrowdChange account, the payment is linked to it.
Issue a tax receipt for a Tap to Pay gift
The app doesn't collect a mailing address, so a tax receipt isn't issued at the moment a donor taps. What happens next depends on the receipt option you choose after Payment Successful!:
-
Show QR Code or Text Receipt: the donor opens a page where they enter their details, including their mailing address, and ask for a tax receipt. Once they submit it, the tax receipt is issued and emailed to them automatically, as long as tax receipts are turned on for your fundraiser and the gift is eligible. You don't need to do anything.
-
Email Receipt: the donor gets the standard receipt email only. It doesn't include the tax receipt page, so a tax receipt isn't requested or issued.
Tip: if a donor wants a tax receipt, choose Show QR Code or Text Receipt, not Email Receipt.
If a donor didn't submit the page, or you'd rather collect their details yourself, there are two other ways to give them a receipt.
Before the payment (recommended if you know the donor wants a receipt): create an offline donation with the donor's full details, then take the payment with Tap to Pay. See Take payment for an offline donation. The receipt is issued from the donor details on the offline donation once the payment goes through.
After the payment, from your reports:
-
Click your name in the top-right corner, then click Admin.
-
In the left menu, click Reports, then Transactions.
-
Find the Tap payment and click it to open Transaction details. To list only Tap payments, use the Processing source filter (see Find CrowdChange Tap payments in your reports).
-
In the Tax receipt section, click Issue tax receipt.
-
Check the donor's details. Anything entered in the app when the payment was taken is filled in for you. Enter anything that's missing, such as the donor's name or mailing address.
See How to use the Transactions report and Tax receipts and eligibility for more.
Take payment for an offline donation
Use this when you want to enter a donor's details on a computer first, such as their name, mailing address and tax receipt information, and then take the payment on a phone. Once the payment goes through, the donor's tax receipt is issued using the details from the offline donation.
On a computer:
-
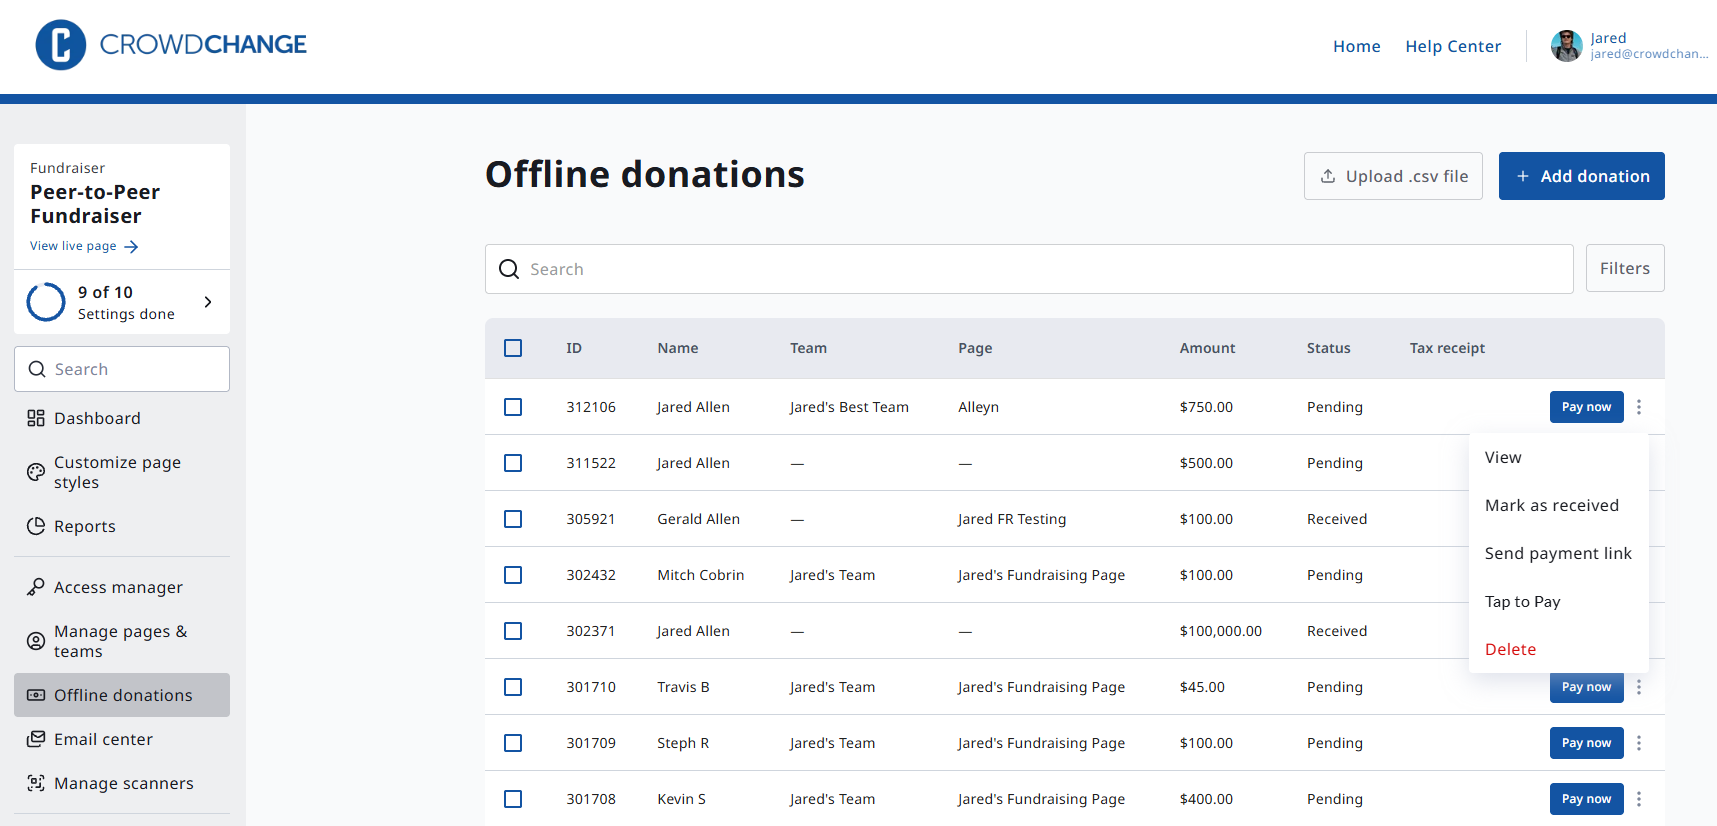
In your fundraiser's left menu, click Offline donations.
-
Click + Add donation and enter the donor's details and the amount. Leave the donation's status as Pending. Tap to Pay is only offered for pending donations, not for ones marked as received or already paid online.
-
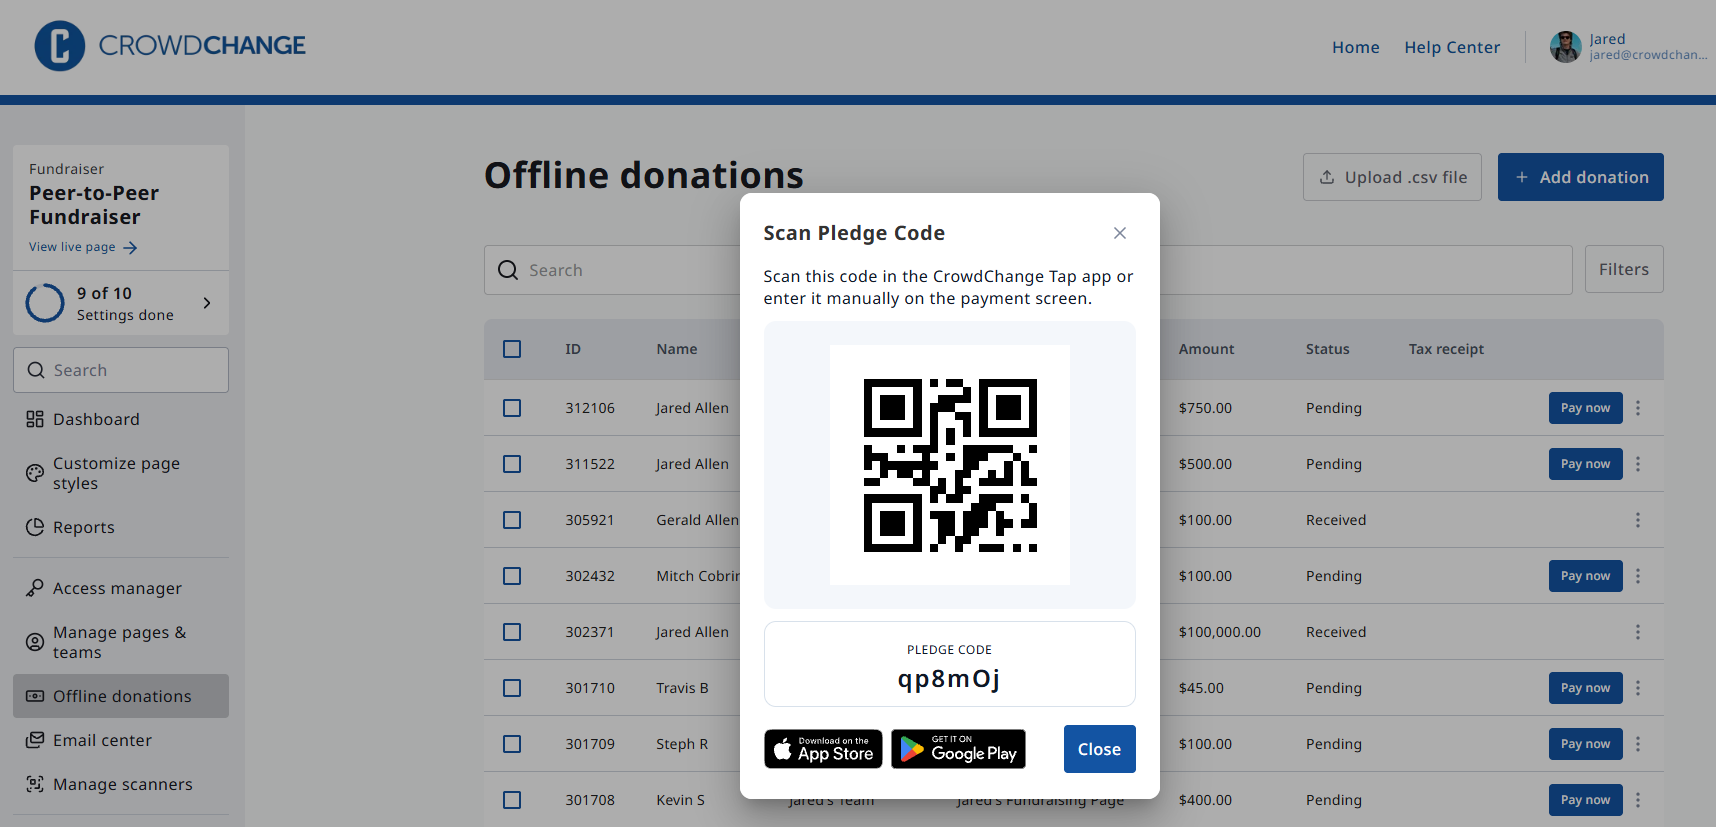
In the list, click the ⋮ menu on that donation and select Tap to Pay. The Scan Pledge Code window opens with a QR code and the pledge code.
On the phone:
-
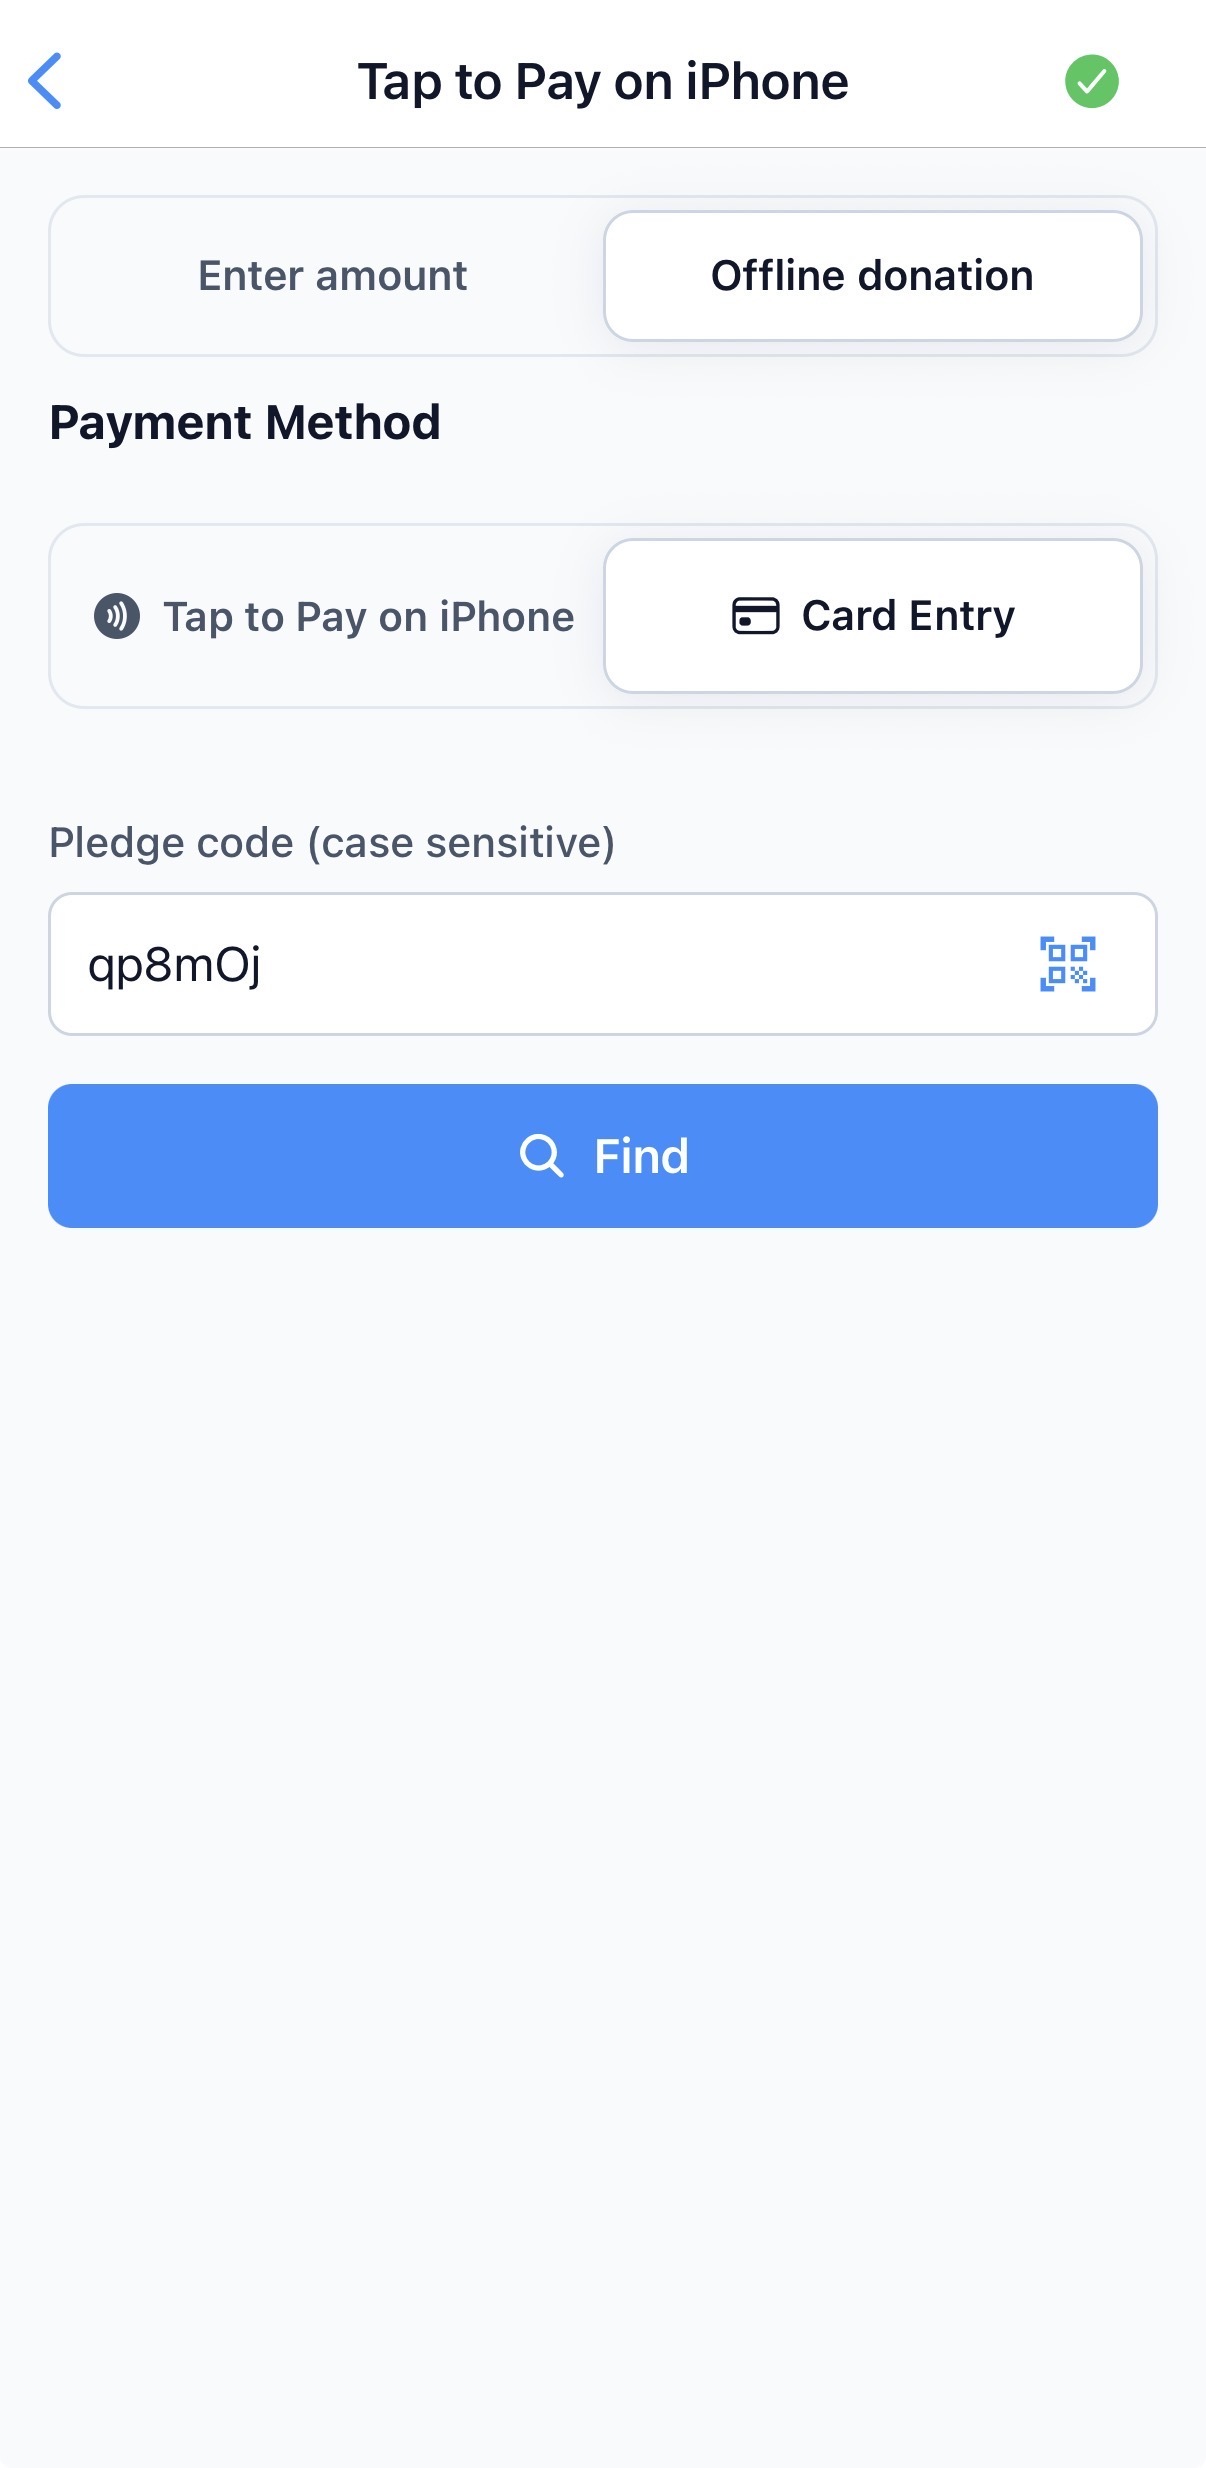
In the app, tap Tap to Pay on iPhone, then the Offline donation tab. Under Payment Method, choose Tap to Pay on iPhone or Card Entry.
-
Under Pledge code (case sensitive), tap the QR icon in the field and scan the code from the Scan Pledge Code window. Or type the pledge code exactly as shown, matching upper- and lower-case letters. Tap Find. The transaction number, amount and donor details fill in. The amount is locked. To pick a different offline donation, tap Change.
-
Tap Continue and take the payment.
You can't change the amount or the name in the app. To change them, edit the offline donation first.
Tip: the ⋮ menu also has Send payment link, which emails the donor a link to pay online. Use it when the donor isn't at the event.
Find CrowdChange Tap payments in your reports
Every transaction now records where it was made, such as on your fundraiser page, through an embed, or in CrowdChange Tap. This includes Tap payments made before this change, so you can report on past events too. You don't need a separate fundraiser or giving tier to track Tap revenue.
To see your Tap payments:
-
Go to Admin › Reports › Transactions.
-
Under + More filters, choose Processing source, then select Tap.
The processing source also appears in each transaction's details, under Payment.
Moving from the web ticket scanner
The browser-based ticket scanner is being retired:
|
When |
What changes |
|---|---|
|
Since October 2026 |
The web scanner page shows a banner pointing to CrowdChange Tap. |
|
From November 1, 2026 |
Only fundraisers that already have the web scanner turned on can keep using it. New fundraisers, and fundraisers that never turned it on, must use CrowdChange Tap. |
|
Date to be announced |
The web scanner is turned off for everyone. |
If you have an event coming up, we recommend setting it up on CrowdChange Tap now.
Tips and troubleshooting
|
Problem |
What to do |
|---|---|
|
I can't find the CrowdChange Tap settings in Additional settings |
They've moved to Purchase options › CrowdChange Tap. |
|
No CrowdChange Tap icon or access code |
Turn on Ticket scanner or Tap to Pay under Purchase options › CrowdChange Tap. |
|
A feature's switch is missing on the CrowdChange Tap page |
Tap to Pay needs Stripe. If you're on Stripe, or the ticket scanner is missing, contact your Partner Success Manager to enable the feature on your account. |
|
The switch is greyed out |
Your Blueprint has locked the setting. Change it on the Blueprint. |
|
CrowdChange Tap or Scan tickets is missing in Set permissions |
Turn on the matching feature for the fundraiser first. For Scan tickets, the fundraiser also needs tickets or registrations. |
|
A volunteer can scan but can't take payments |
They only have Scan tickets. Check CrowdChange Tap for full access. |
|
The app doesn't accept an access code or pledge code I typed |
Pledge codes are case sensitive, so match upper- and lower-case letters exactly. Also check for look-alike characters, such as the letter O and the number 0. Scanning the QR code avoids both problems. |
|
Tap to Pay is missing from an offline donation's ⋮ menu |
Tap to Pay is only offered while an offline donation is Pending. If it's been marked as received or paid online, it's already complete. To take a new payment, add a new offline donation. |
|
No Scan Tickets button |
Check the list under Scan tickets at the door. |
|
A check-in isn't showing in the Tickets Report |
Check the phone's internet connection, then refresh the report. |
|
A red warning triangle appears on the payment screen |
Tap to Pay hasn't finished setting up on this phone. Check that the phone is supported, that Location is allowed for the app, and that the phone is online. Then close and reopen the app. If it persists, use Card Entry and contact support. [VERIFY] the recommended fix with Dev. |
|
Tap to Pay doesn't work on one phone |
The phone may not have NFC, or its software may be out of date. Check Stripe's supported device lists. |
|
A debit card was declined |
It's probably an Interac-only card. Ask for a credit card or a Visa or Mastercard debit card. |
|
A larger payment won't tap |
Most cards cap contactless at about $250. Use Card Entry. |
|
A payment shows as anonymous |
No donor details were entered. Ask the donor to use the link on their receipt. |
|
A donor didn't get a receipt |
After each payment, choose Show QR Code, Email Receipt or Text Receipt before tapping New Transaction. To send one later, open the payment in Admin › Reports › Transactions and click Resend receipt. |
|
A donor needs a tax receipt for a tap |
If the donor chose Show QR Code or Text Receipt and submitted their details, their tax receipt is issued automatically. If they chose Email Receipt, or never submitted their details, issue it from the payment's Transaction details. Next time, ask the donor to use the QR code or text option, or use an offline donation to collect their details first. See Issue a tax receipt for a Tap to Pay gift. |
|
Can the app sell tickets at the door? |
No. Tap to Pay takes a payment amount; it doesn't issue tickets or run auction checkout. Sell tickets through your fundraiser page. |